
Foreword
Qt is a cross-platform C++ application development framework, often used by frontend programmers to design and develop GUI applications. CLion, on the other hand, is a powerful cross-platform IDE developed by JetBrains for C/C++ program development.
Qt's integrated development environment comes with QtCreator as an IDE for writing programs, which is quite good. However, as a multi-platform user, the author has become accustomed to CLion's C++ development environment. Therefore, I tried to use CLion as a platform for developing Qt applications. CLion itself supports creating Qt projects and also supports using QtDesigner (the visual graphic design interface in the Qt integrated development environment) as an external tool, so its deployment is not actually complicated. However, tutorials on the internet are generally based on Windows systems, and while Linux systems can theoretically adopt the deployment method of Windows systems without issues (after all, both are cross-platform applications, and the codebase is completely portable), in practice, the author encountered several pitfalls and discovered some problems that might not occur on Windows but do on Linux. This article will briefly describe the deployment method of the Qt+CLion environment on Archlinux and solutions for potential problems.

Deployment Process
Installing Qt5.15.x
There are many methods for installing Qt on Linux available online. Here, I will use ArchLinux, which the author uses, as an example (installation methods for different Linux distributions are largely similar and can be found online, so I won't elaborate here). Qt 5.x and 6.x versions can be installed from Arch's official repositories, while earlier versions can be installed from the AUR repository. Here, the author recommends installing version 5.15, as Qt5 is a relatively stable and long-term supported version. Open a terminal and enter the following commands:
sudo pacman -Syyu
sudo pacman -S qt5-base
sudo pacman -S qt5-doc
If you need to use Qt's built-in IDE, you can also install QtCreator:
sudo pacman -S qtcreatorSince CLion will be used as the development environment, installing QtCreator is optional. For information on Qt installation and configuration, refer to the official wiki's documentation on Qt.
If you are using a KDE desktop system, it is highly likely that you have already installed Qt-related development components when installing the desktop system (as KDE itself is developed based on Qt's GUI tools). You can check the installed qmake and Qt component versions in your system using the following command, and also get information about the Qt installation location:
qmake -vIf the system reports an error stating that the command cannot be
found after inputting it, this indicates that Qt basic components are
not installed in your system, or your qmake program cannot be found in
the /usr/bin/ directory. qmake not being in this directory
might be because it wasn't downloaded via the system's package manager,
but rather Qt was manually installed using the official downloader or an
offline package. Then you can try the following command to link the
qmake program to the specified directory:
ln -s /你的Qt路径/Qt版本号/gcc_64/bin/qmake /usr/binIf, after entering the qmake version query command, qmake shows that no qmake path and version are specified, or if you have multiple versions of Qt installed and want to specify a particular version for use, then you need to change the Qtchooser settings; this is a package that allows you to specify Qt and qmake versions. There are many documents available online regarding the usage of Qtchooser, which you can search for yourself. Generally, Qtchooser defaults to a specific version and does not require manual changes.
CLion Configuration for Qt Environment
First, of course, you need to install CLion. Go to JetBrains' official CLion download page to download and install the relevant package. Of course, there are also CLion packages in Arch's AUR repository, which can be installed directly using package managers like yay or paru:
paru -S clion #或者yay -S clionAfter downloading, open CLion and create a QtWidgets project, as shown below:
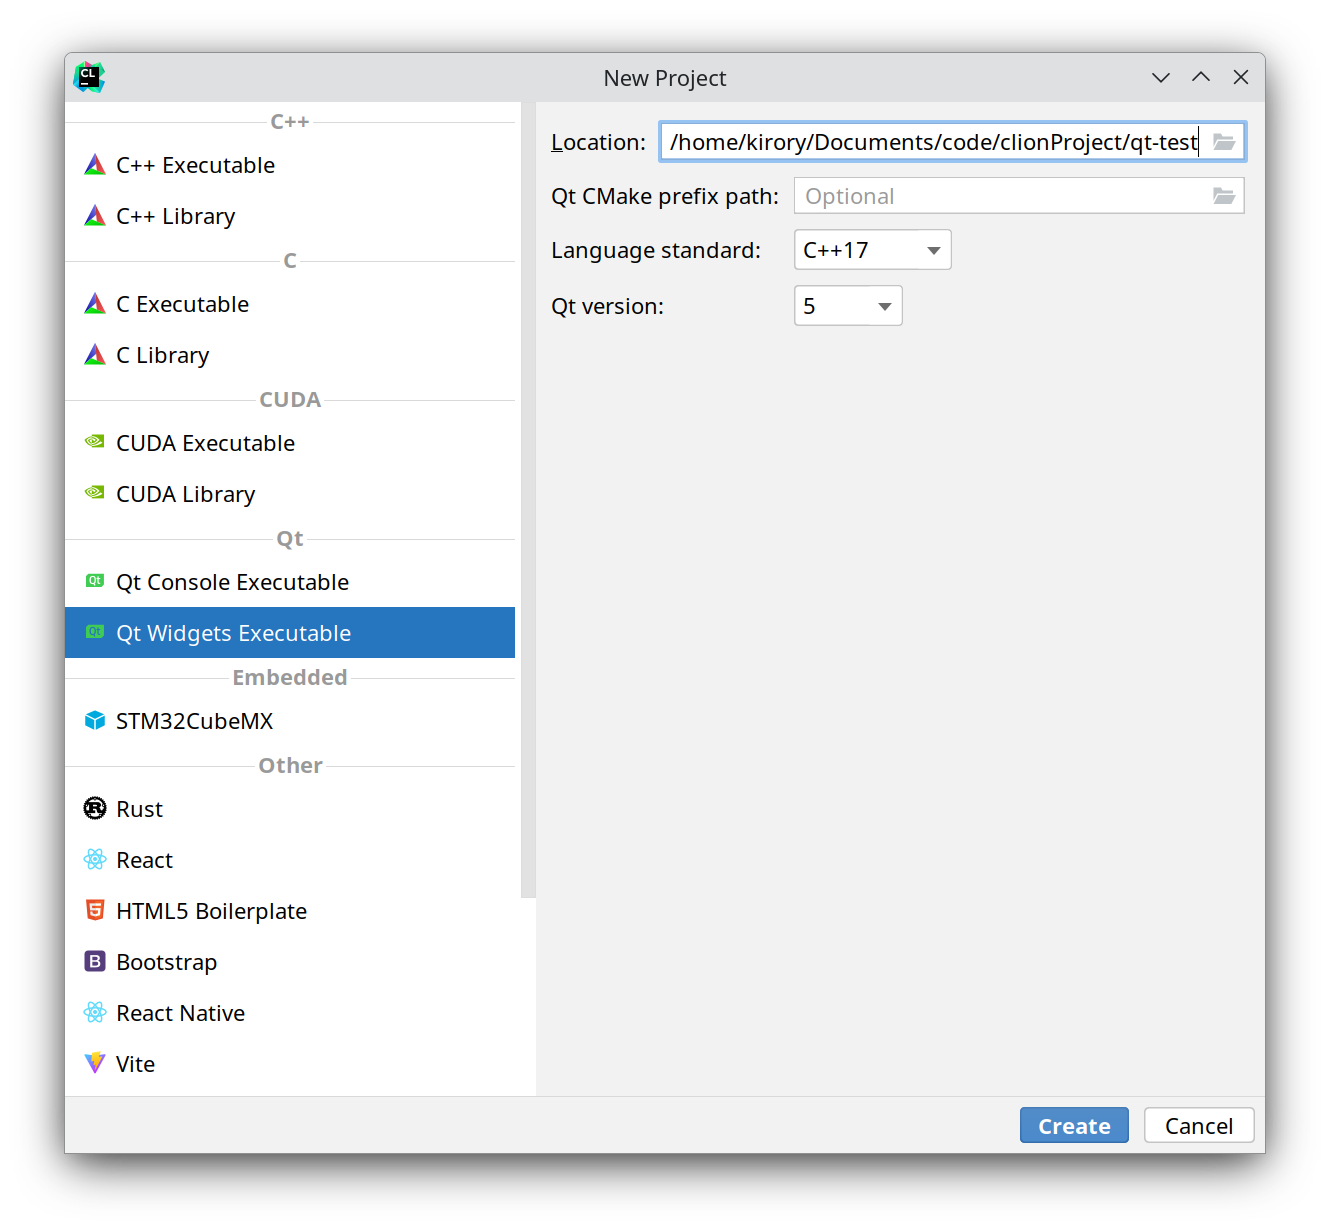
Select the language standard and Qt version according to your installation. Version 5 means version number 5.x.x, and so on. Here, the author installed version 5.15, so I will choose 5.
The Qt CMake prefix path allows CMake files to find your Qt
components during compilation. Normally, if you install from official
repositories, you don't need to fill in this field. If you installed it
manually, or if the project compilation later reports an error that Qt
cannot be found, then you need to add your Qt path in this field, or in
the project's CMakeLists.txt, add the following code before
the find_package() function:
set(cmake_prefix_path "你的Qt安装路径")Of course, there's another way: add this prefix path to your environment variables. Enter the following command in the terminal:
export CMAKE_PREFIX_PATH = 你的Qt安装路径The above two setup methods were found by the author online. Their feasibility cannot be guaranteed due to variations in each person's installed environment and system. For more information about CMake compilation of Qt, you can refer to the official Qt documentation here.
After the project is created, it will come with example code. Let's
directly compile and run the main.cpp file to see if it can
run successfully:
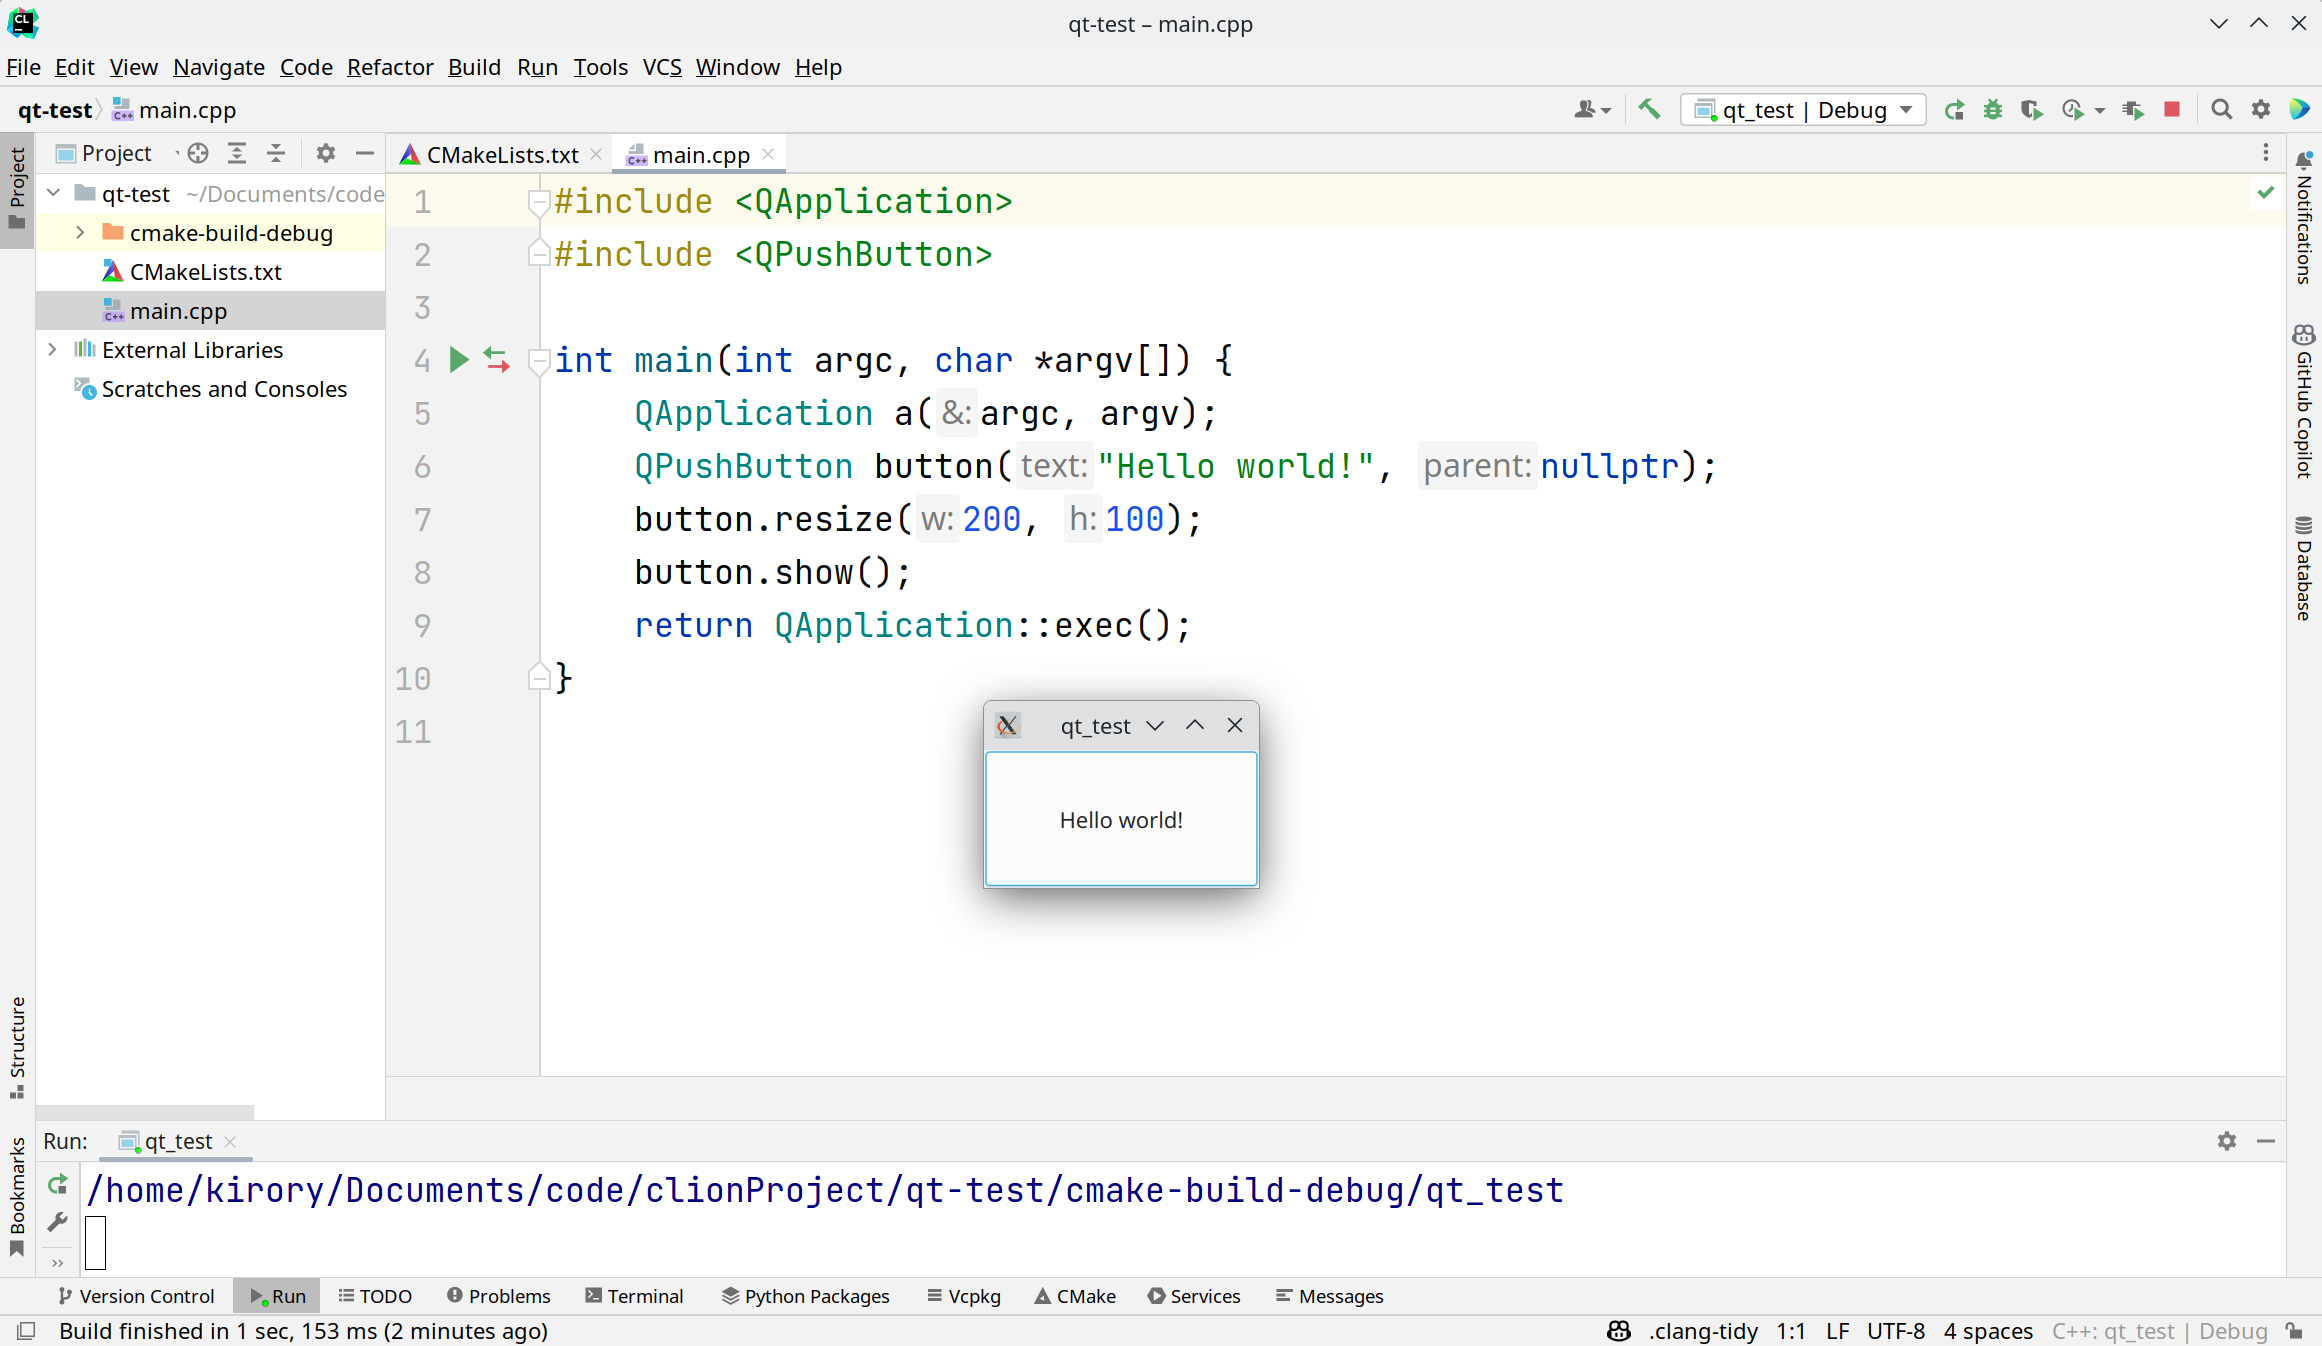
After successful execution, you will see the example program. It is a window filled with a "Hello world!" button, and the window name is the project name.
Of course, by now you can already use CLion to write Qt-related
programs. However, we also need to configure Qt's GUI design tool. This
way, you can use a visual interface when designing window styles, rather
than tweaking code line by line. Qt's visual graphic design interface
tool is QtDesigner. It is usually included in the qt-base
package we installed and does not require separate installation. Now we
need to import this tool into CLion. In CLion's settings menu, select
Tools \(\rightarrow\) External Tools,
and add the designer (or designer-qt5) program to external tools, as
shown below:
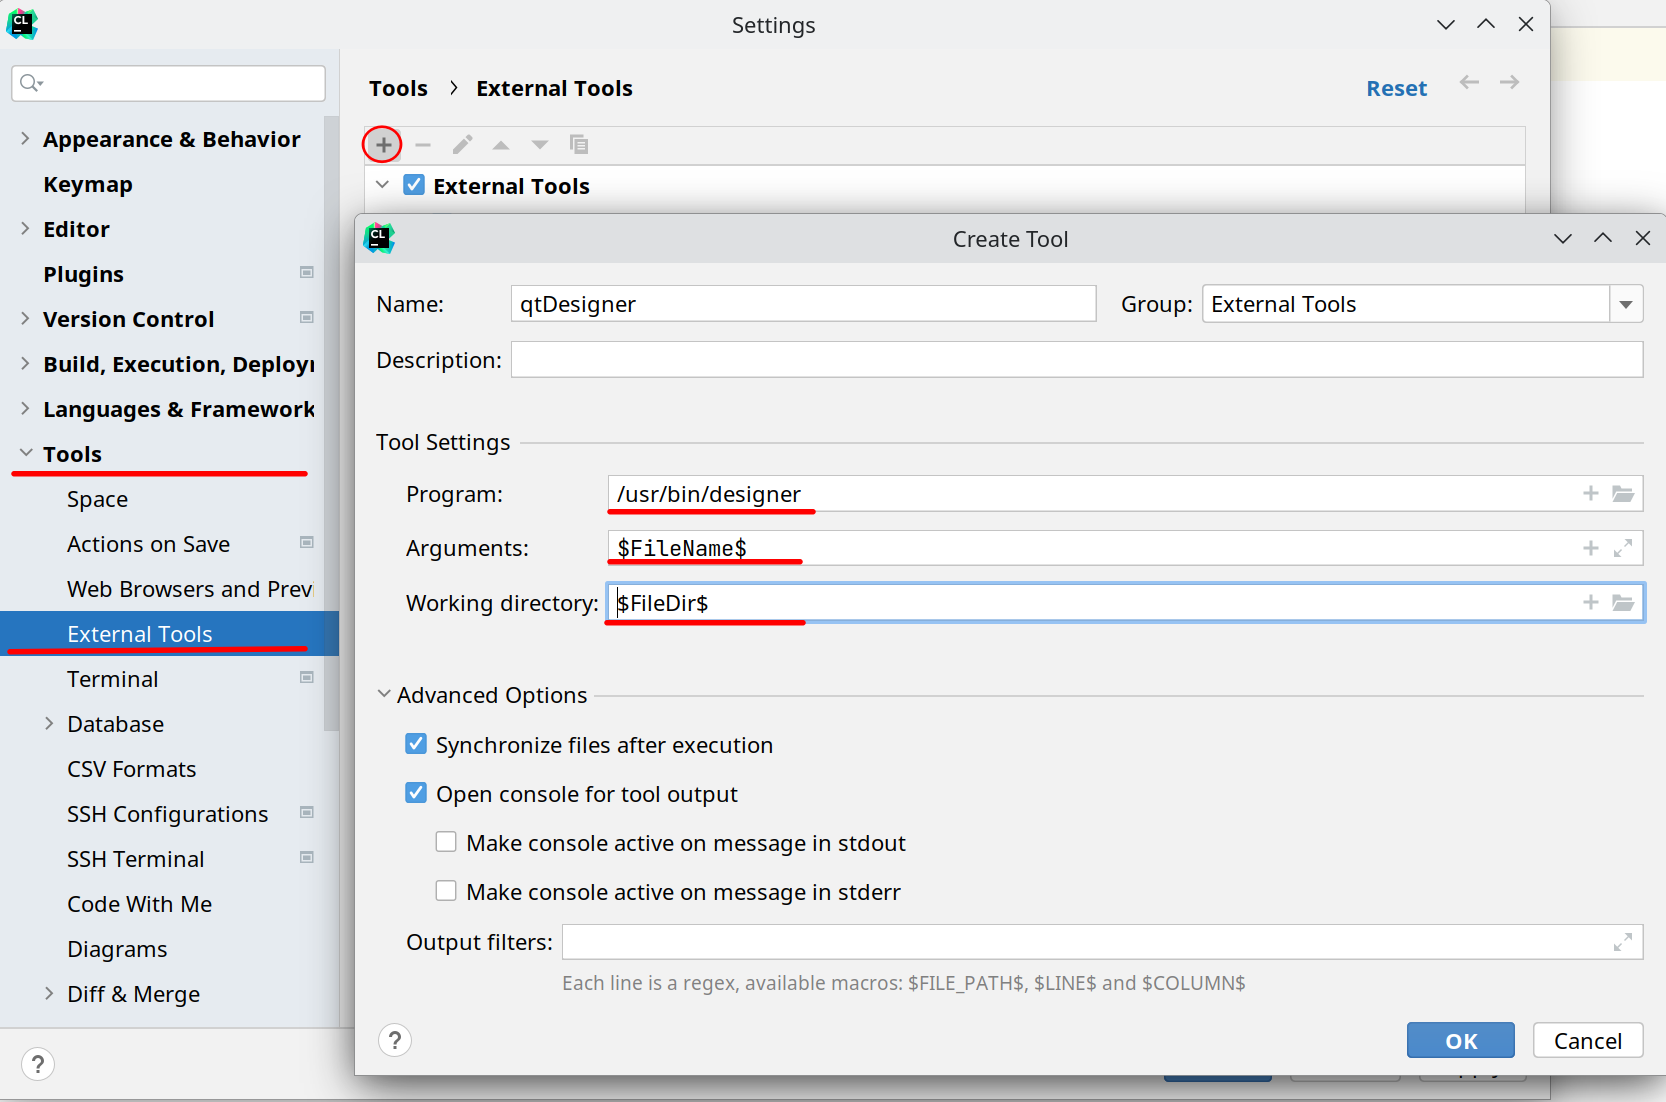
In the Program field, enter the directory of the QtDesigner program.
You can refer to the path filled in by the author here. The target
program name can be designer or designer-qt5.
Refer to the information entered by the author in the image above for
the Arguments and Working directory fields. This ensures that any files
you create in the project's subdirectories can be found.
After creation, create a Qt .ui class file in the project directory (you can create it wherever you want within the project directory). When creating this file, a .h header file and a .cpp file with the same name will be automatically created. Then right-click your .ui file and open it with External Tools \(\rightarrow\) Designer:
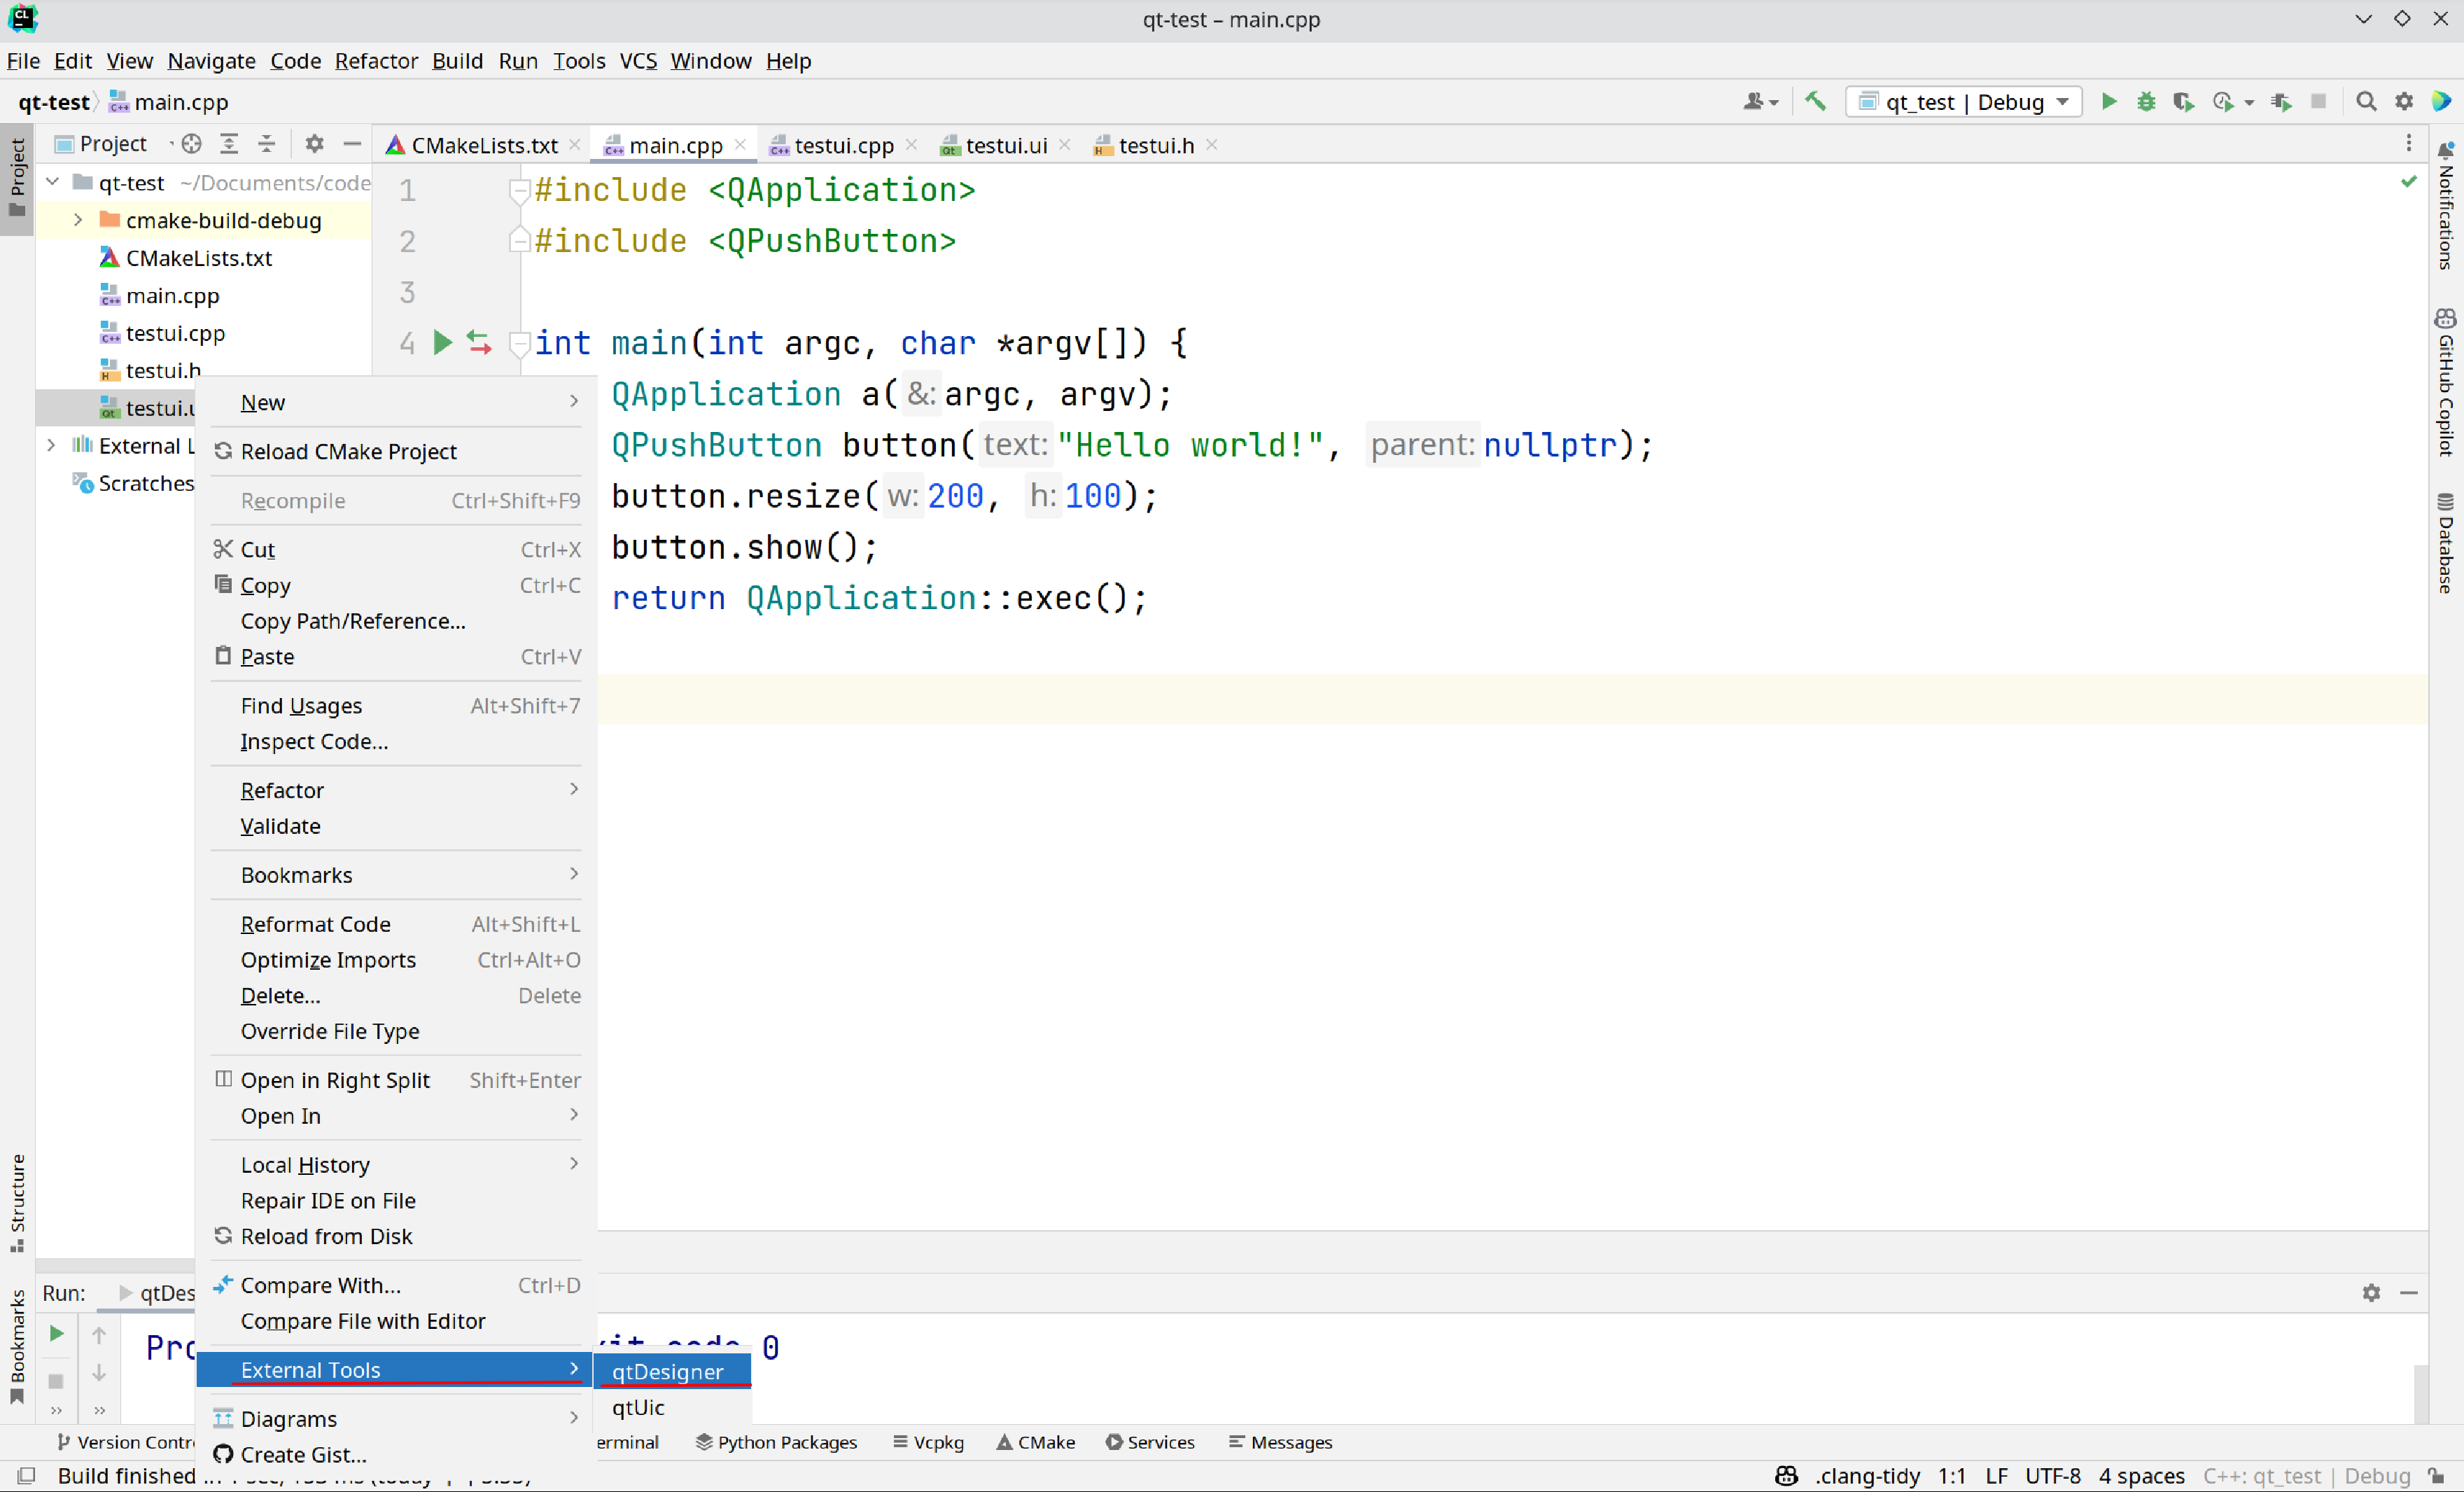
After opening, you can visually design window components in this interface:
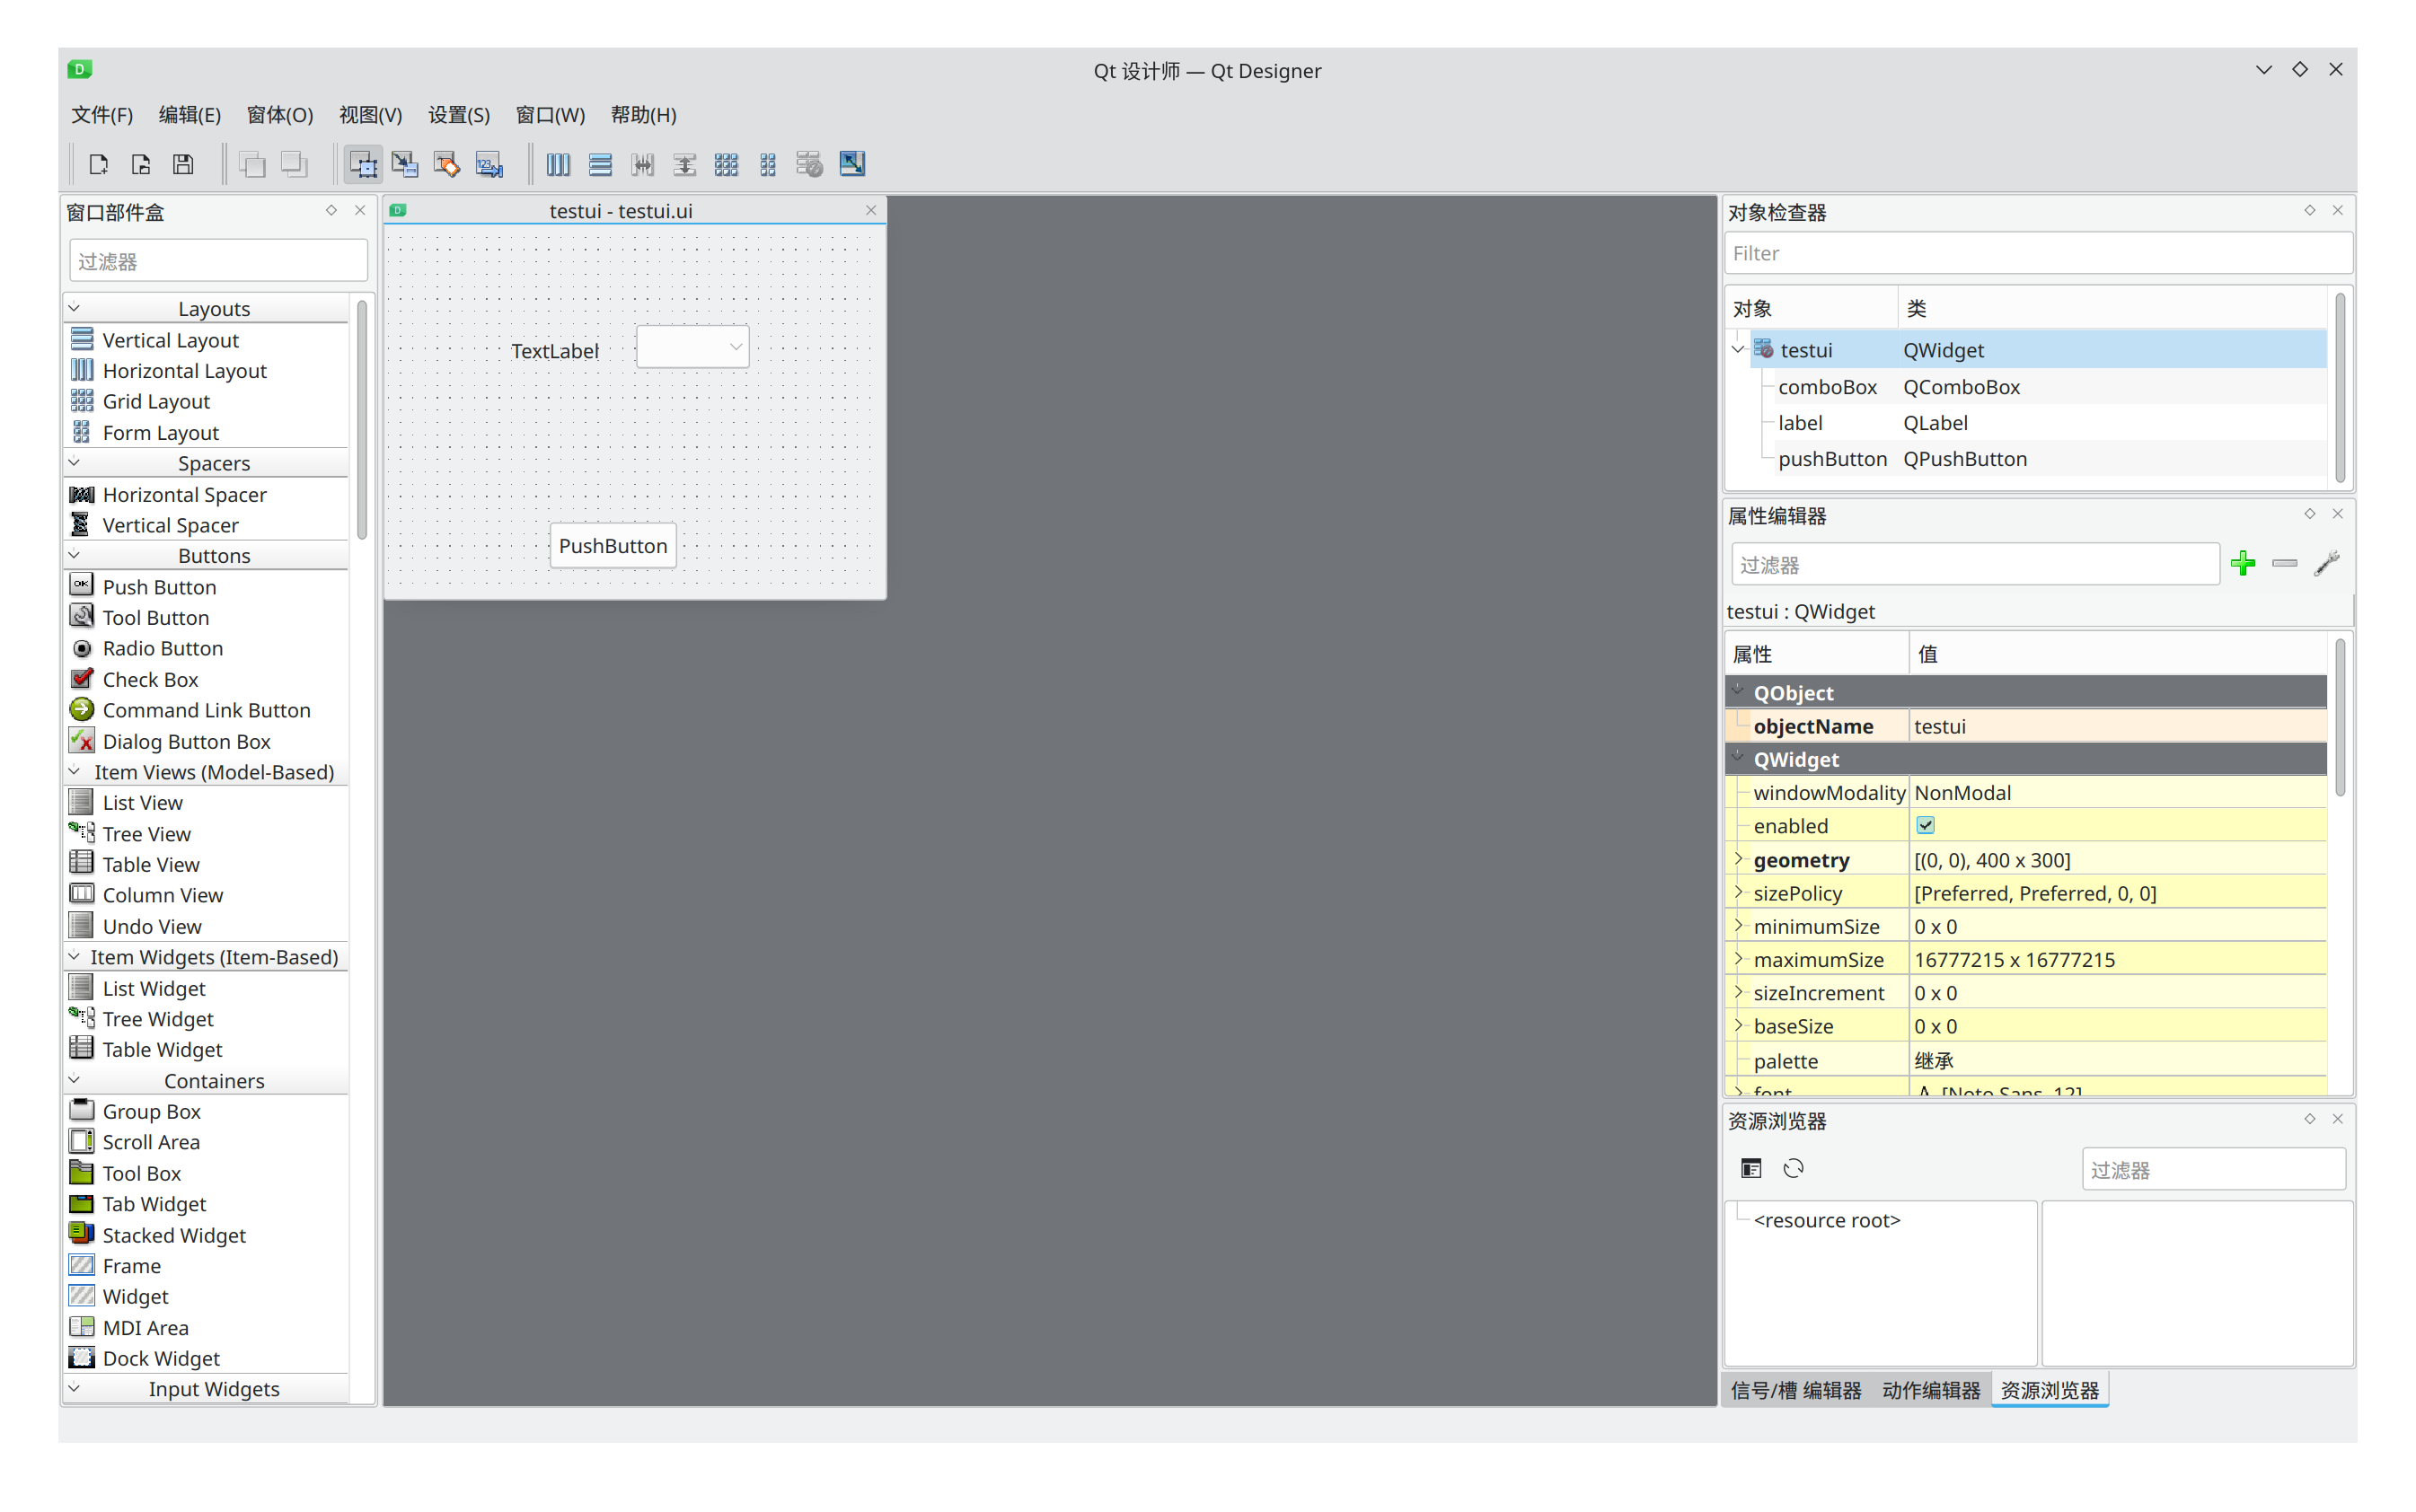
After designing the window, save and exit the interface. If you need
to use the newly saved window at this point, you can include the header
file created along with the .ui class (in the author's example, it's
testui.h) in main.cpp. The class declared in
this header file is the window class that was previously saved. We
declare a variable of this class and display it using the
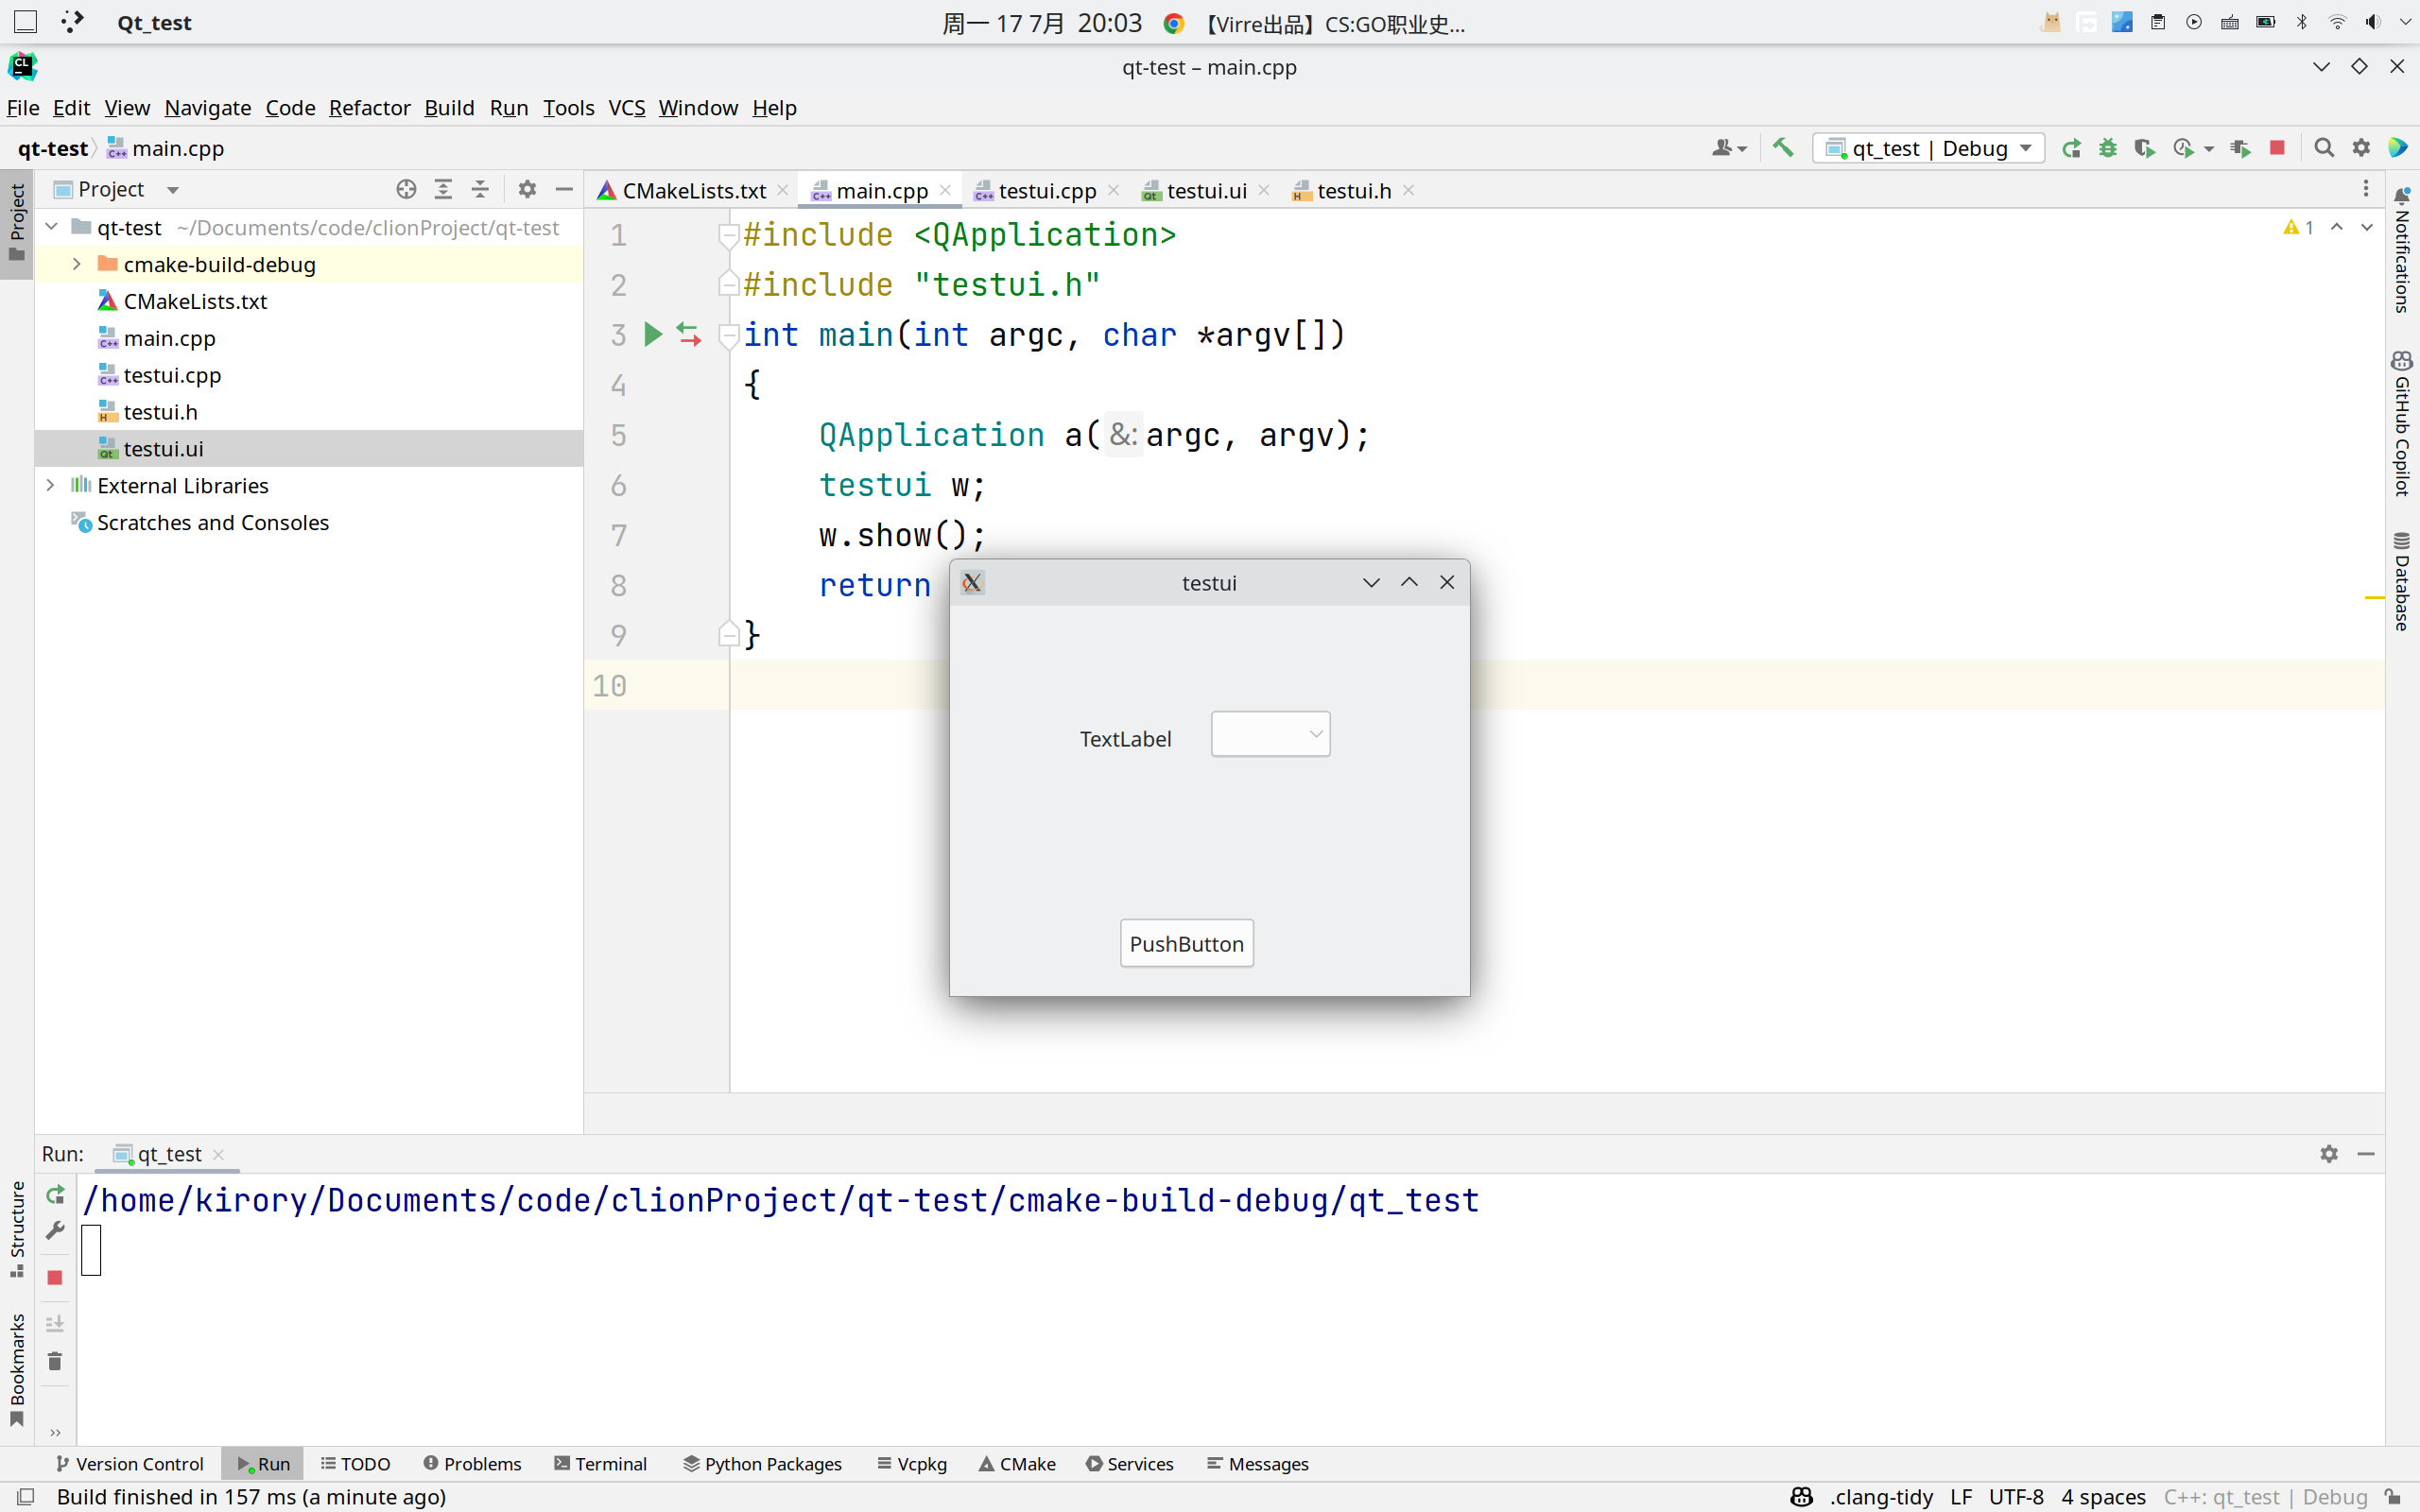
.show() function. Here is the example code:
#include <QApplication>
#include "testui.h"
int main(int argc, char *argv[])
{
    QApplication a(argc, argv);
    testui w;
    w.show();
    return a.exec();
}
Before running, we need to check the CMake configuration to ensure
that the three newly added files can also be compiled. In the project's
CMakeLists.txt, modify the add_executable()
line to include all files that need to be compiled:
add_executable(qt_test main.cpp testui.cpp testui.h testui.ui)Normally, CLion automatically adds new files to the list of compiled files, so manual addition is not necessary.
Then we compile and run the project, and the window is displayed successfully:
Possible Problems: AutoUic error
AutoUic error
-------------
"SRC:/testui.cpp"
includes the uic file "ui_testUi.h",
but the user interface file "testUi.ui"
could not be found in the following directories
  "SRC:"

ninja: build stopped: subcommand failed.
Uic is the user interface compiler that transforms your .ui class
file into a .h header file. CLion automatically configures it for
automatic compilation in CMakeLists.txt by default.
Automatic compilation errors often occur when the name of the .ui class
contains uppercase characters during creation (This is a peculiar
characteristic of AutoUic: you enter uppercase when creating it, but the
actual generated .ui file and corresponding header file are lowercase,
while the class within the header file is uppercase. This can lead to
incorrect parameters during uic compilation, preventing the generation
of the correct header file or header filename).
To avoid this error, please set the name of the .ui class to all lowercase letters when creating it. If you need to use an uppercase name for the .ui class, you can also manually compile the .ui file using uic. In the directory where your .ui file is located, enter the following simple command:
uic 你的ui类文件名.ui -o ui_你的ui类文件名.hThis will generate a header file starting with ui_ in
the same directory as the .ui file.
If you frequently use uic manually with the above method, then the author recommends adding uic to external tools as well. The adding and usage methods are consistent with QtDesigner, and the parameters for adding are as follows:
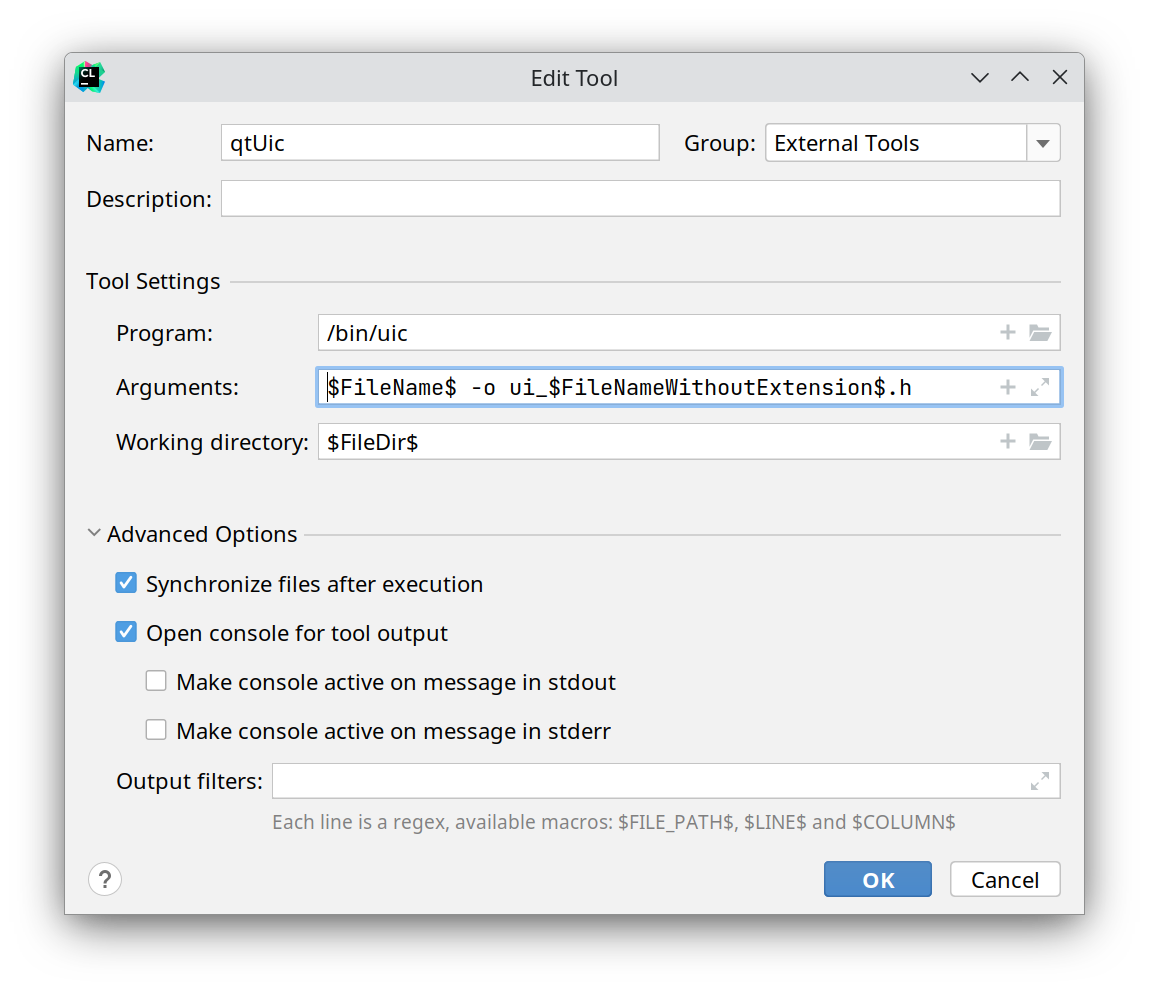
Note that the Arguments field should follow the author's writing above. The effect of use is consistent with the command-line method. The Program field should be adjusted according to the uic program's directory.
At this point, the basic configuration of the CLion+Qt development environment is complete.
Postscript
This is my first blog post, driven by interest, and doesn't contain much advanced technical content. CLion itself has excellent support for Qt. This article mainly records the author's process of configuring Qt tools in CLion and some solutions to problems encountered. Some problems encountered during the first configuration can be quite frustrating because the solutions found online often do not specify the exact error situations they address. This led to having to try these methods one by one (and for some problems, very little information could even be found TAT). This article provides specific solutions for certain problems, at least they worked for the author when these issues were encountered. There are also some untested methods proposed considering potential situations; some of these methods come from online resources, and others from official documentation.
Due to the limited length of the article, there may be omissions or errors. Please feel free to point them out.