
写在前面的话
Qt是一个跨平台的C++应用程序开发框架,常被前端程序员用于设计和开发GUI程序。而CLion则是由JetBrains开发的一款功能强大的跨平台IDE,用于开发C/C++程序。
Qt集成开发环境中自带QtCreator作为用于编写程序的IDE是相当不错的,但笔者作为多平台用户,已经习惯了CLion的C++开发环境,因此尝试使用CLion作为开发Qt程序的平台。CLion本身就支持创建Qt程序项目,也支持使用QtDesigner(Qt集成开发环境中的可视化图形设计界面)作为外部工具,因此其部署操作其实并不复杂。但是由于网络上的教程普遍是基于windows系统的,而Linux系统基本照搬windows系统的部署方式在理论上也没有问题(毕竟都是跨平台应用,基代码完全可以移植)。但实际过程中笔者还是踩了不少坑,发现了一些可能不会在windows上发生但在Linux上却会的问题。本文将会简单描述Qt+CLion环境在Archlinux上的部署方法和对于可能碰到问题的解决方案。

部署过程
安装Qt5.15.x
Qt在Linux上的安装方法在网络上有许多,这里以笔者使用的ArchLinux为例(不同系的Linux安装方法大同小异,网上基本都能找的到,这里就不赘述了)。Qt5.x和6.x版本可以从Arch的官方仓库中安装,较早版本则可以从Aur仓库中安装。这里笔者推荐安装的是5.15版本,Qt5是较为稳定并长期支持的版本。打开终端并输入以下指令:
1 | |
如果需要使用Qt自带的IDE,则可以也安装Qtcreator:
1 | |
因为要使用CLion作为开发环境,因此不安装Qtcreator也可以。关于Qt的安装与配置,可以查看官方wiki关于Qt的说明。
如果你使用的是KDE桌面系统,那么大概率你已经在安装桌面系统的时候也已经安装了了Qt的相关开发组件了(毕竟KDE就是基于Qt的GUI工具开发的)。可以通过以下指令查看系统中安装的qmake以及Qt组件的版本,也能获得Qt安装位置的信息:
1 | |
如果输入后系统报错找不到该指令,说明你的系统中并没有安装Qt基础组件,或者你的qmake程序不能在/usr/bin/这个目录下找到。qmake不在该目录的情况有可能是因为没有通过系统的软件包管理器进行下载,而是通过官方的下载器或者离线包手动安装Qt。那么可以尝试以下指令来qmake程序连接到指定目录:
1 | |
如果输入qmake版本查询指令后Qmake显示没有指定Qmake路径和版本,或者你安装了多个版本的Qt,想要指定某个版本使用,那么需要更改Qtchooser相关设置,这是可以让你指定Qt以及Qmake版本的package。关于Qtchooser的使用方法,相关文档有很多,可以自行网上查找。一般情况下Qtchooser会默认指定一个版本,不需要手动更改操作。
CLion配置Qt环境
首先当然是要安装CLion,进入JetBrains的CLion官方下载页面下载相关包并安装,当然Arch的aur库中也有CLion的软件包,可以使用yay或者paru等管理包直接安装:
1 | |
下载后打开CLion并创建一个QtWidgets项目,如下所示:
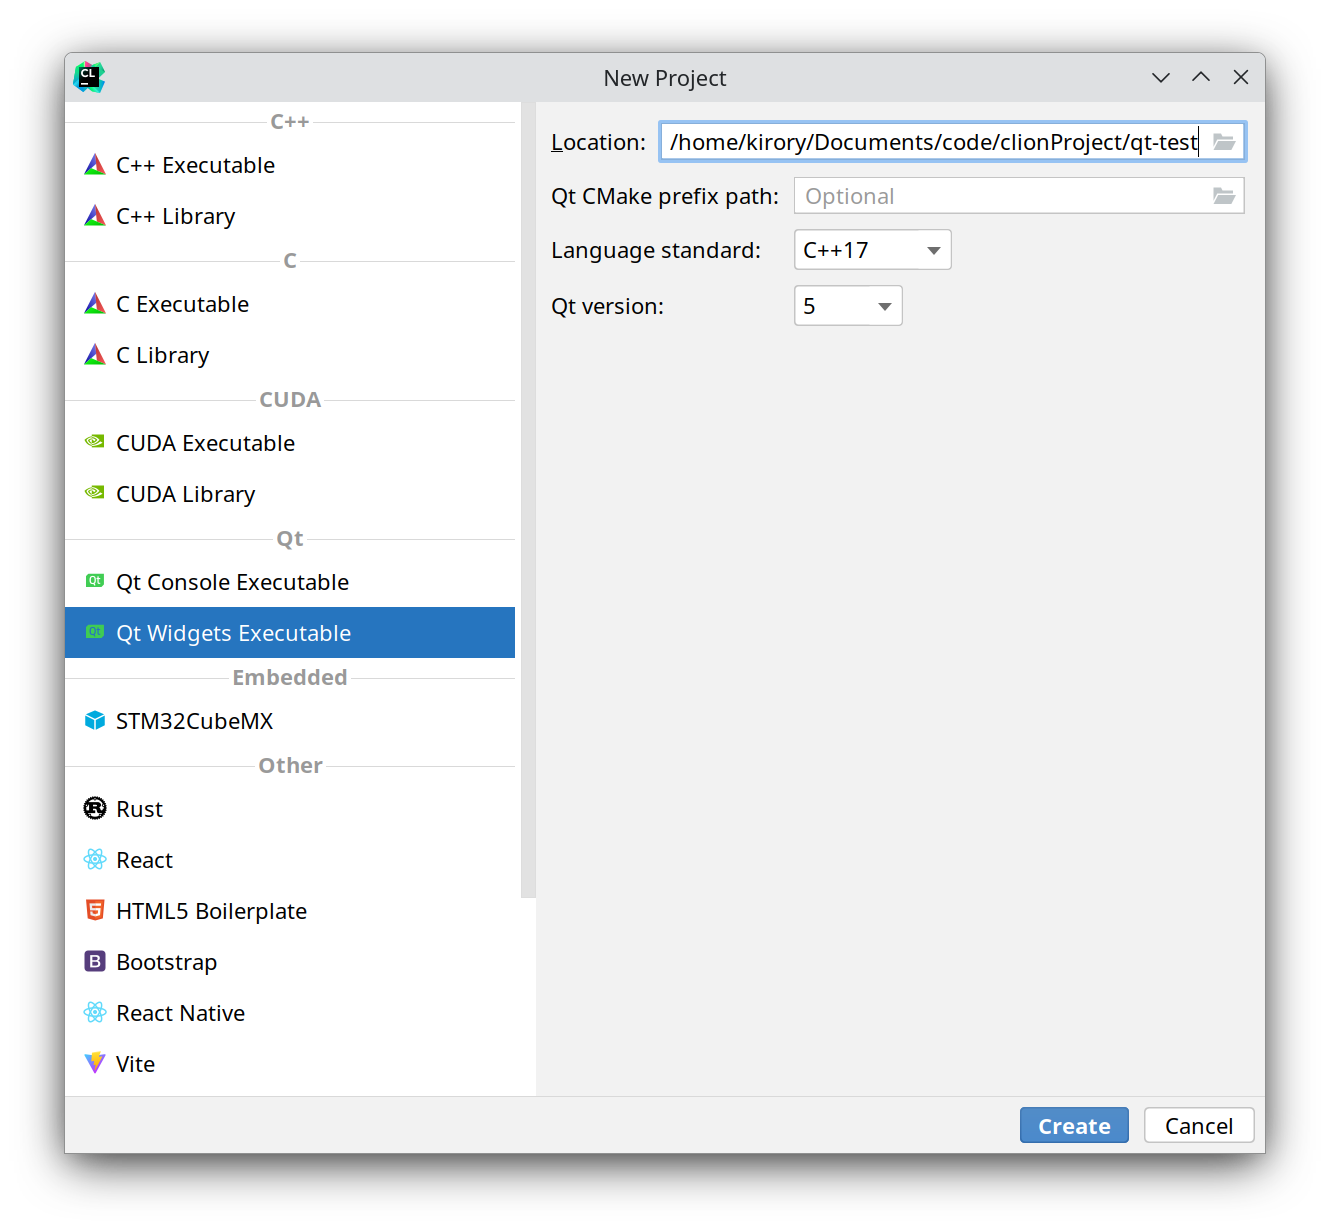
语言标准和Qt版本按照自己的安装情况来选。版本为5就是版本号为5.x.x,其他同理。这里笔者安装的是5.15版本,那么就选择5。
Qt Cmake prefix
path是让Cmake文件在编译时查找到你的Qt组件。正常使用官方库安装一般不需要填写这一栏。如果你是手动安装,或者在之后项目编译时报错找不到Qt,那么需要在这一栏添加你的Qt路径,或者在项目的CMakeLists.txt中,在find_package()这个函数之前添加如下代码:
1 | |
当然还有方法,那就是将这个前置路径添加到你的环境变量里。在终端中输入以下指令:
1 | |
以上两种设置方法是笔者在网上搜到的,因每个人安装的环境系统不同不能保证其可行性。关于Cmake编译Qt的相关事项可以查看这里的Qt官方文档。
项目创建完毕后该项目会自带示例代码。我们直接编译运行main.cpp文件看是否能成功运行:
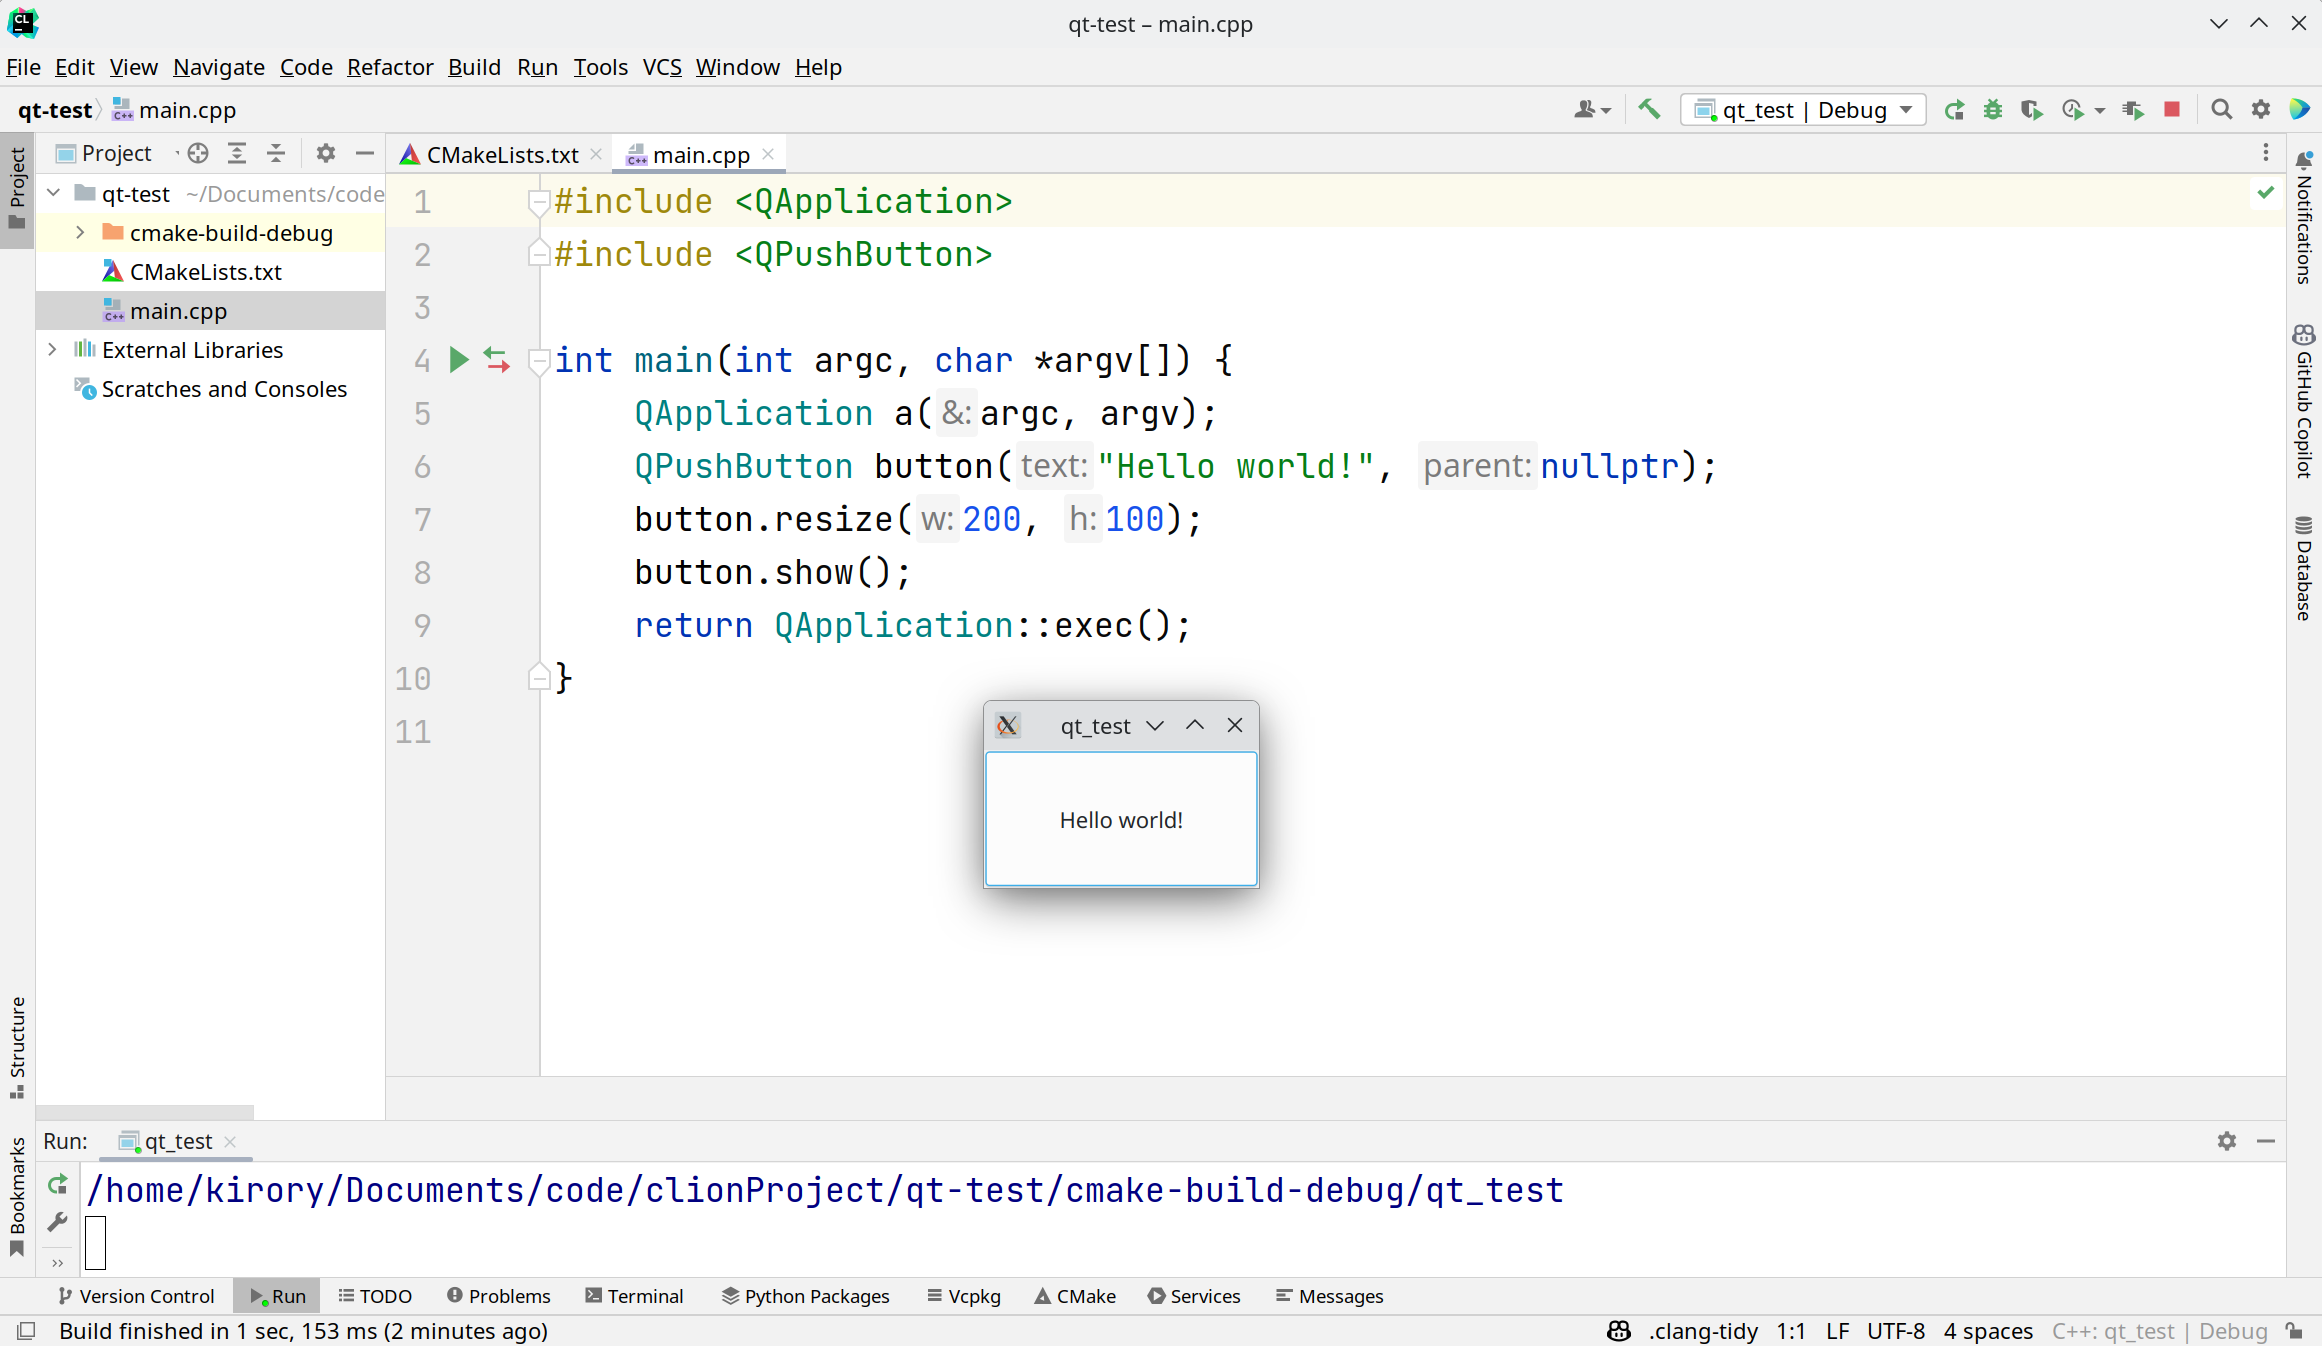
成功运行后就可以看到示例程序,是一个被"Hello world!"的按钮填充的窗口,窗口名就是项目名称。
当然,到现在为止你已经可以使用CLion编写Qt相关程序了。但是我们还需要配置Qt的GUI设计工具,这样就可以在设计窗口样式时使用可视化界面,而不是对着代码慢慢调了。Qt的可视化图形设计界面工具是Qtdesigner,一般包含在我们安装好的qt-base软件包中,不需要单独安装。现在我们需要在CLion中导入这个工具。在CLion的设置菜单中选择工具
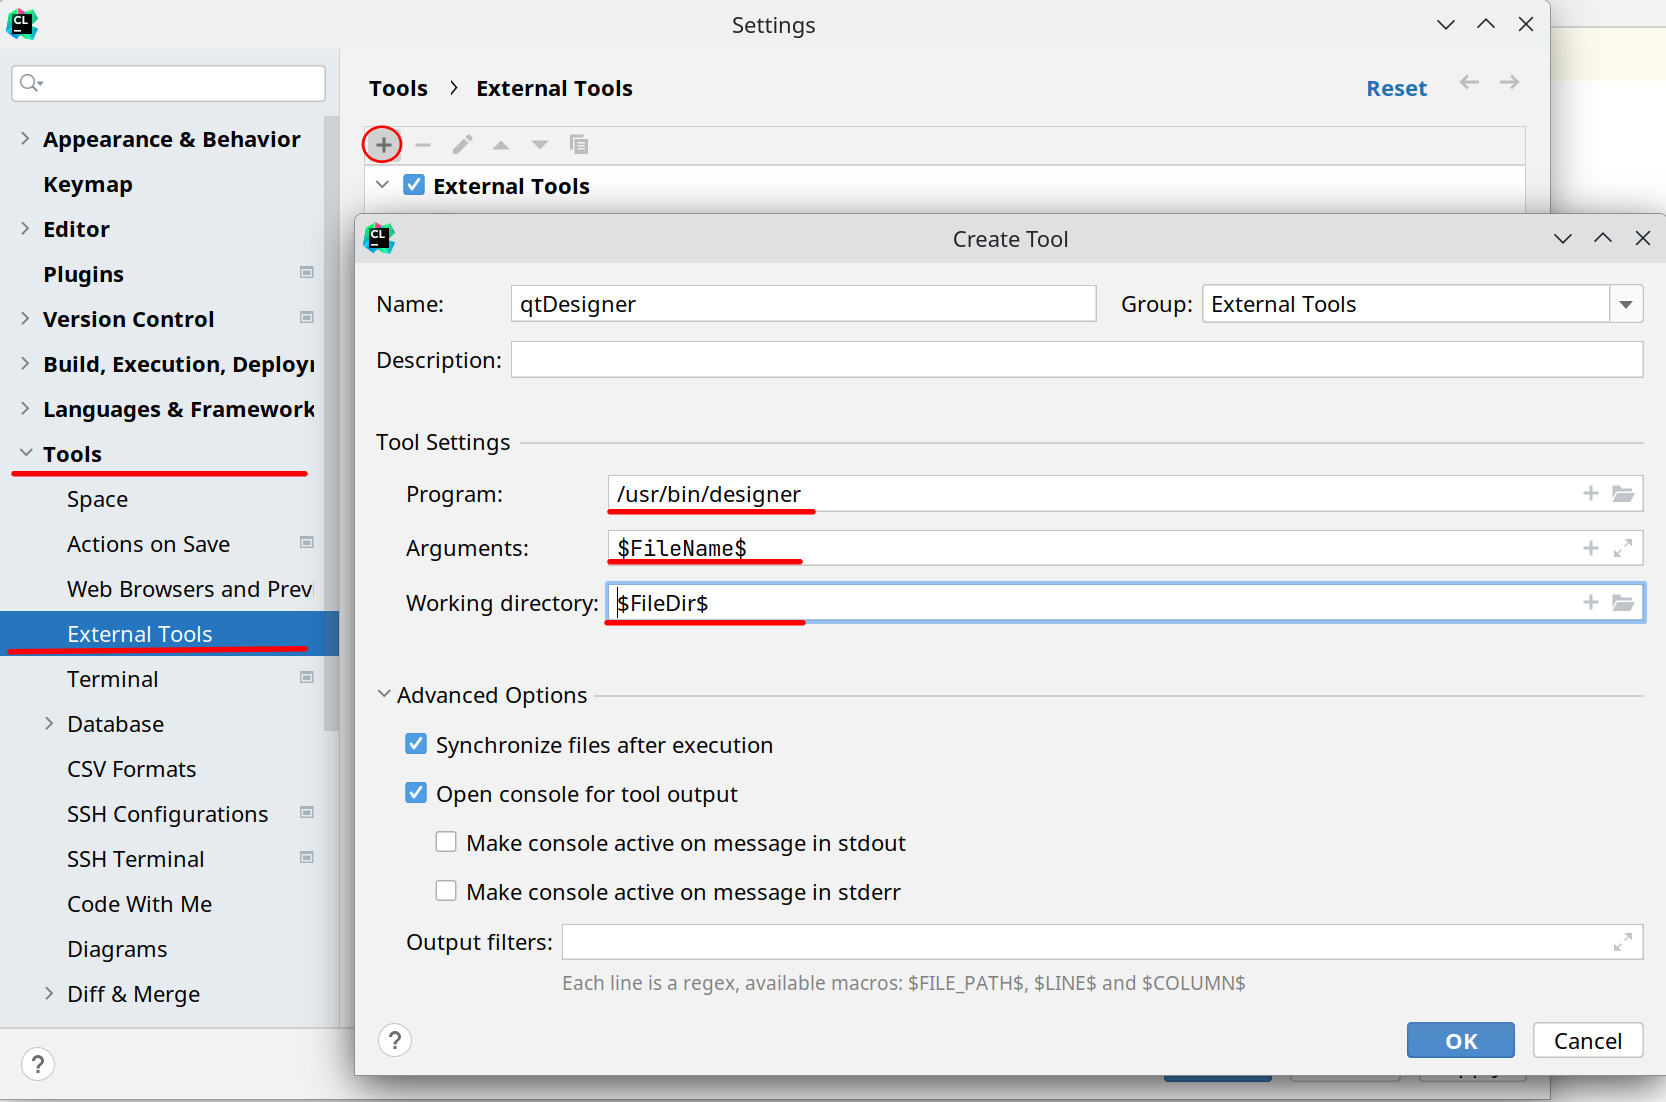
程序栏中输入Qtdesigner程序的目录,可以参考笔者这里填写的路径,目标程序名可以是designer 或者 designer-qt5。参数栏和工作路径参考上图中笔者输入的信息,这样可以保证只要你创建的文件在项目的子目录中都可以被找到。
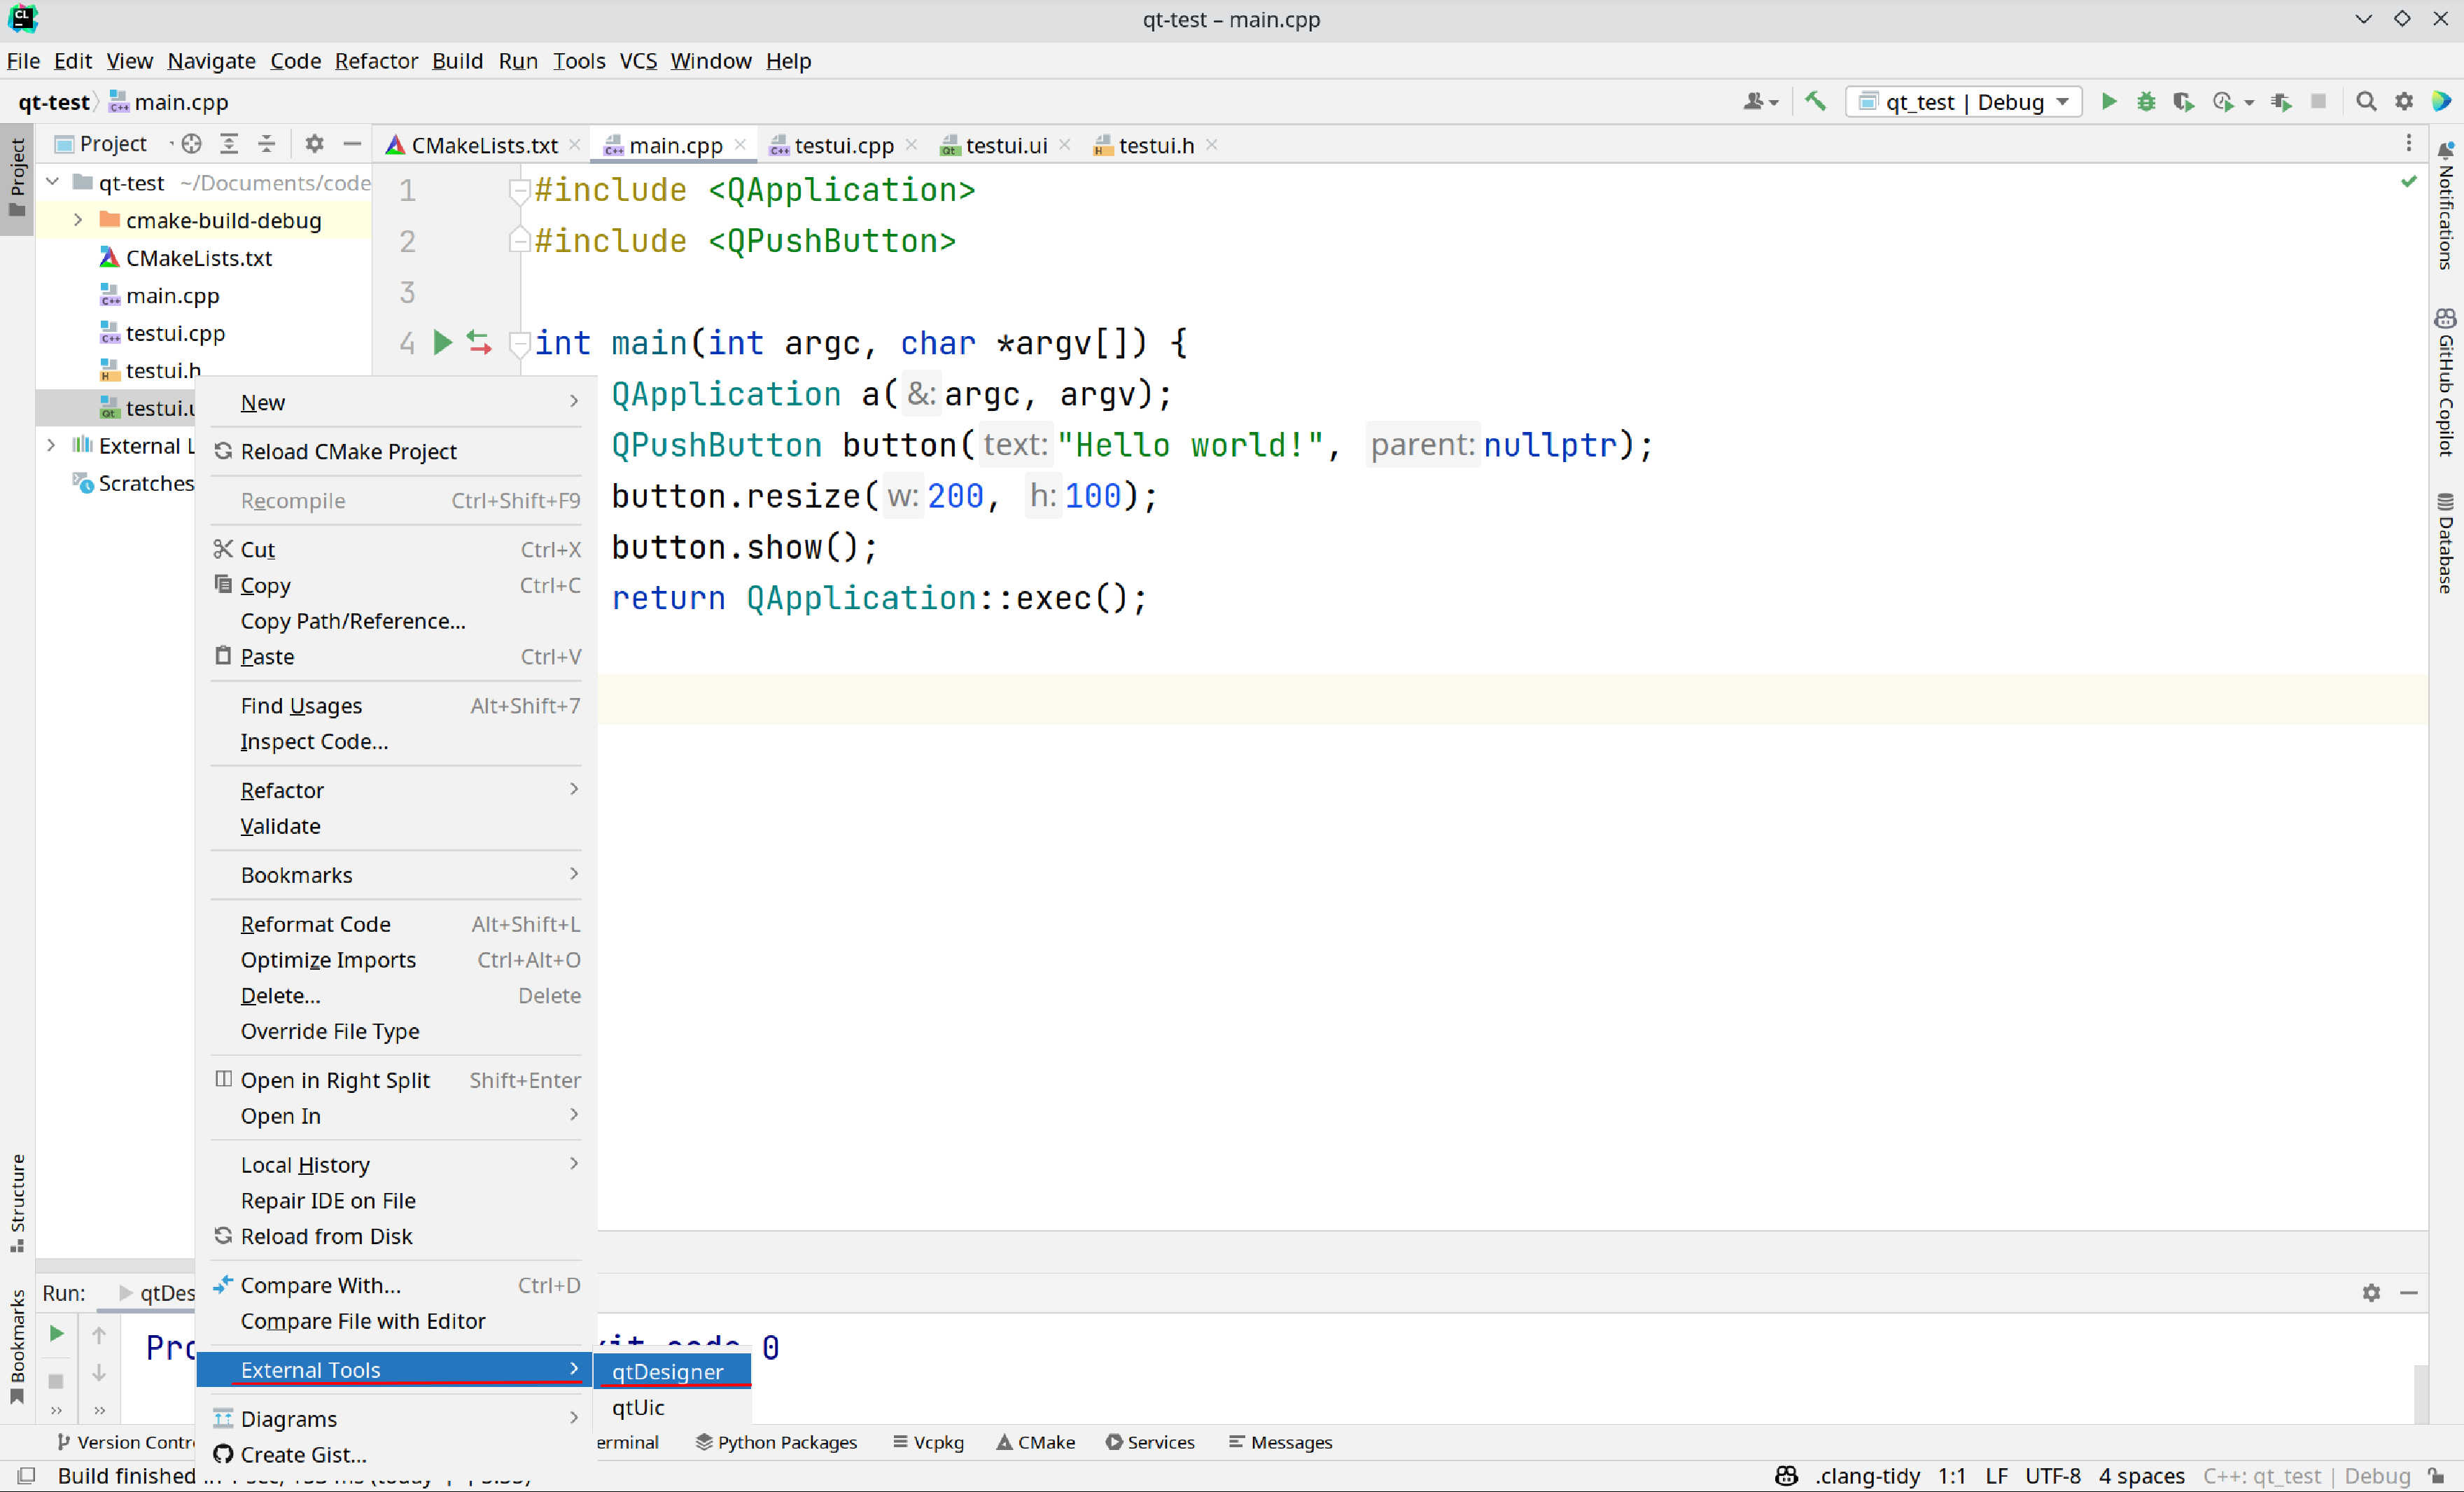
创建完成后,在项目目录下创建一个Qt
.ui类文件(你可以在项目目录下把它创建在你想要的地方)。创建这个文件时会自动创建同名的.h头文件和.cpp。然后右键你的.ui文件,使用外部工具
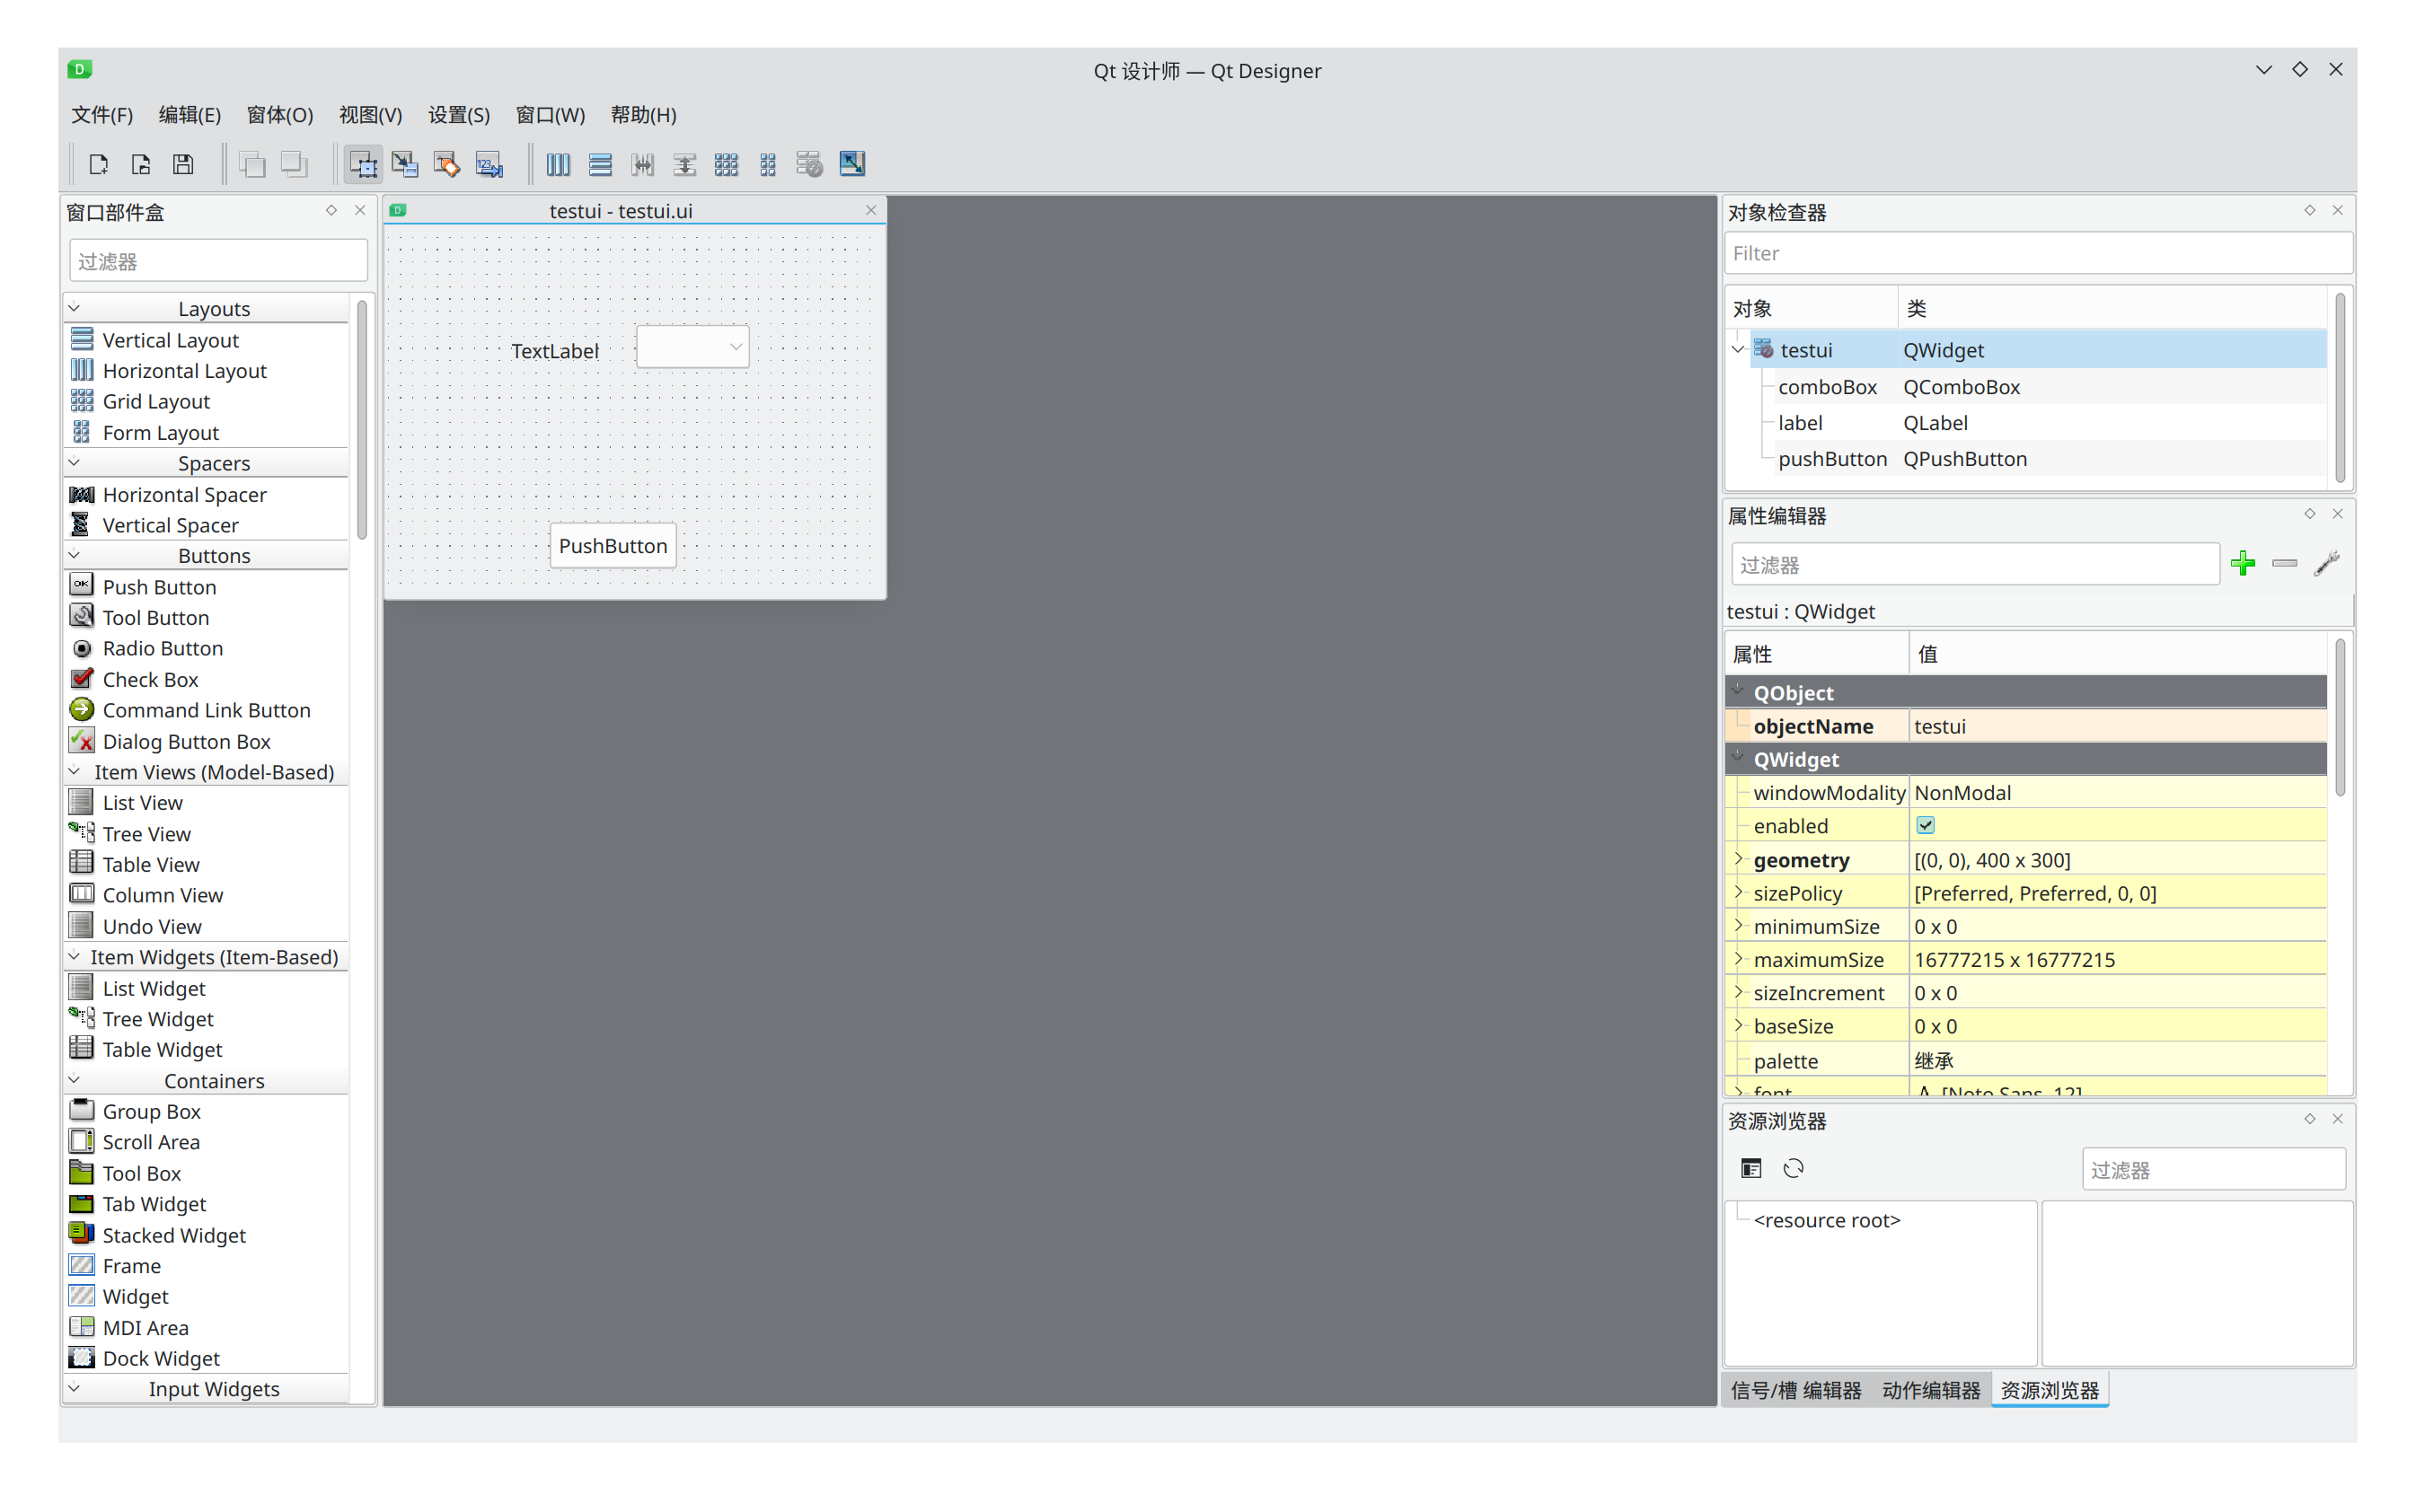
打开后就可以在该界面下可视化设计窗口组建了:
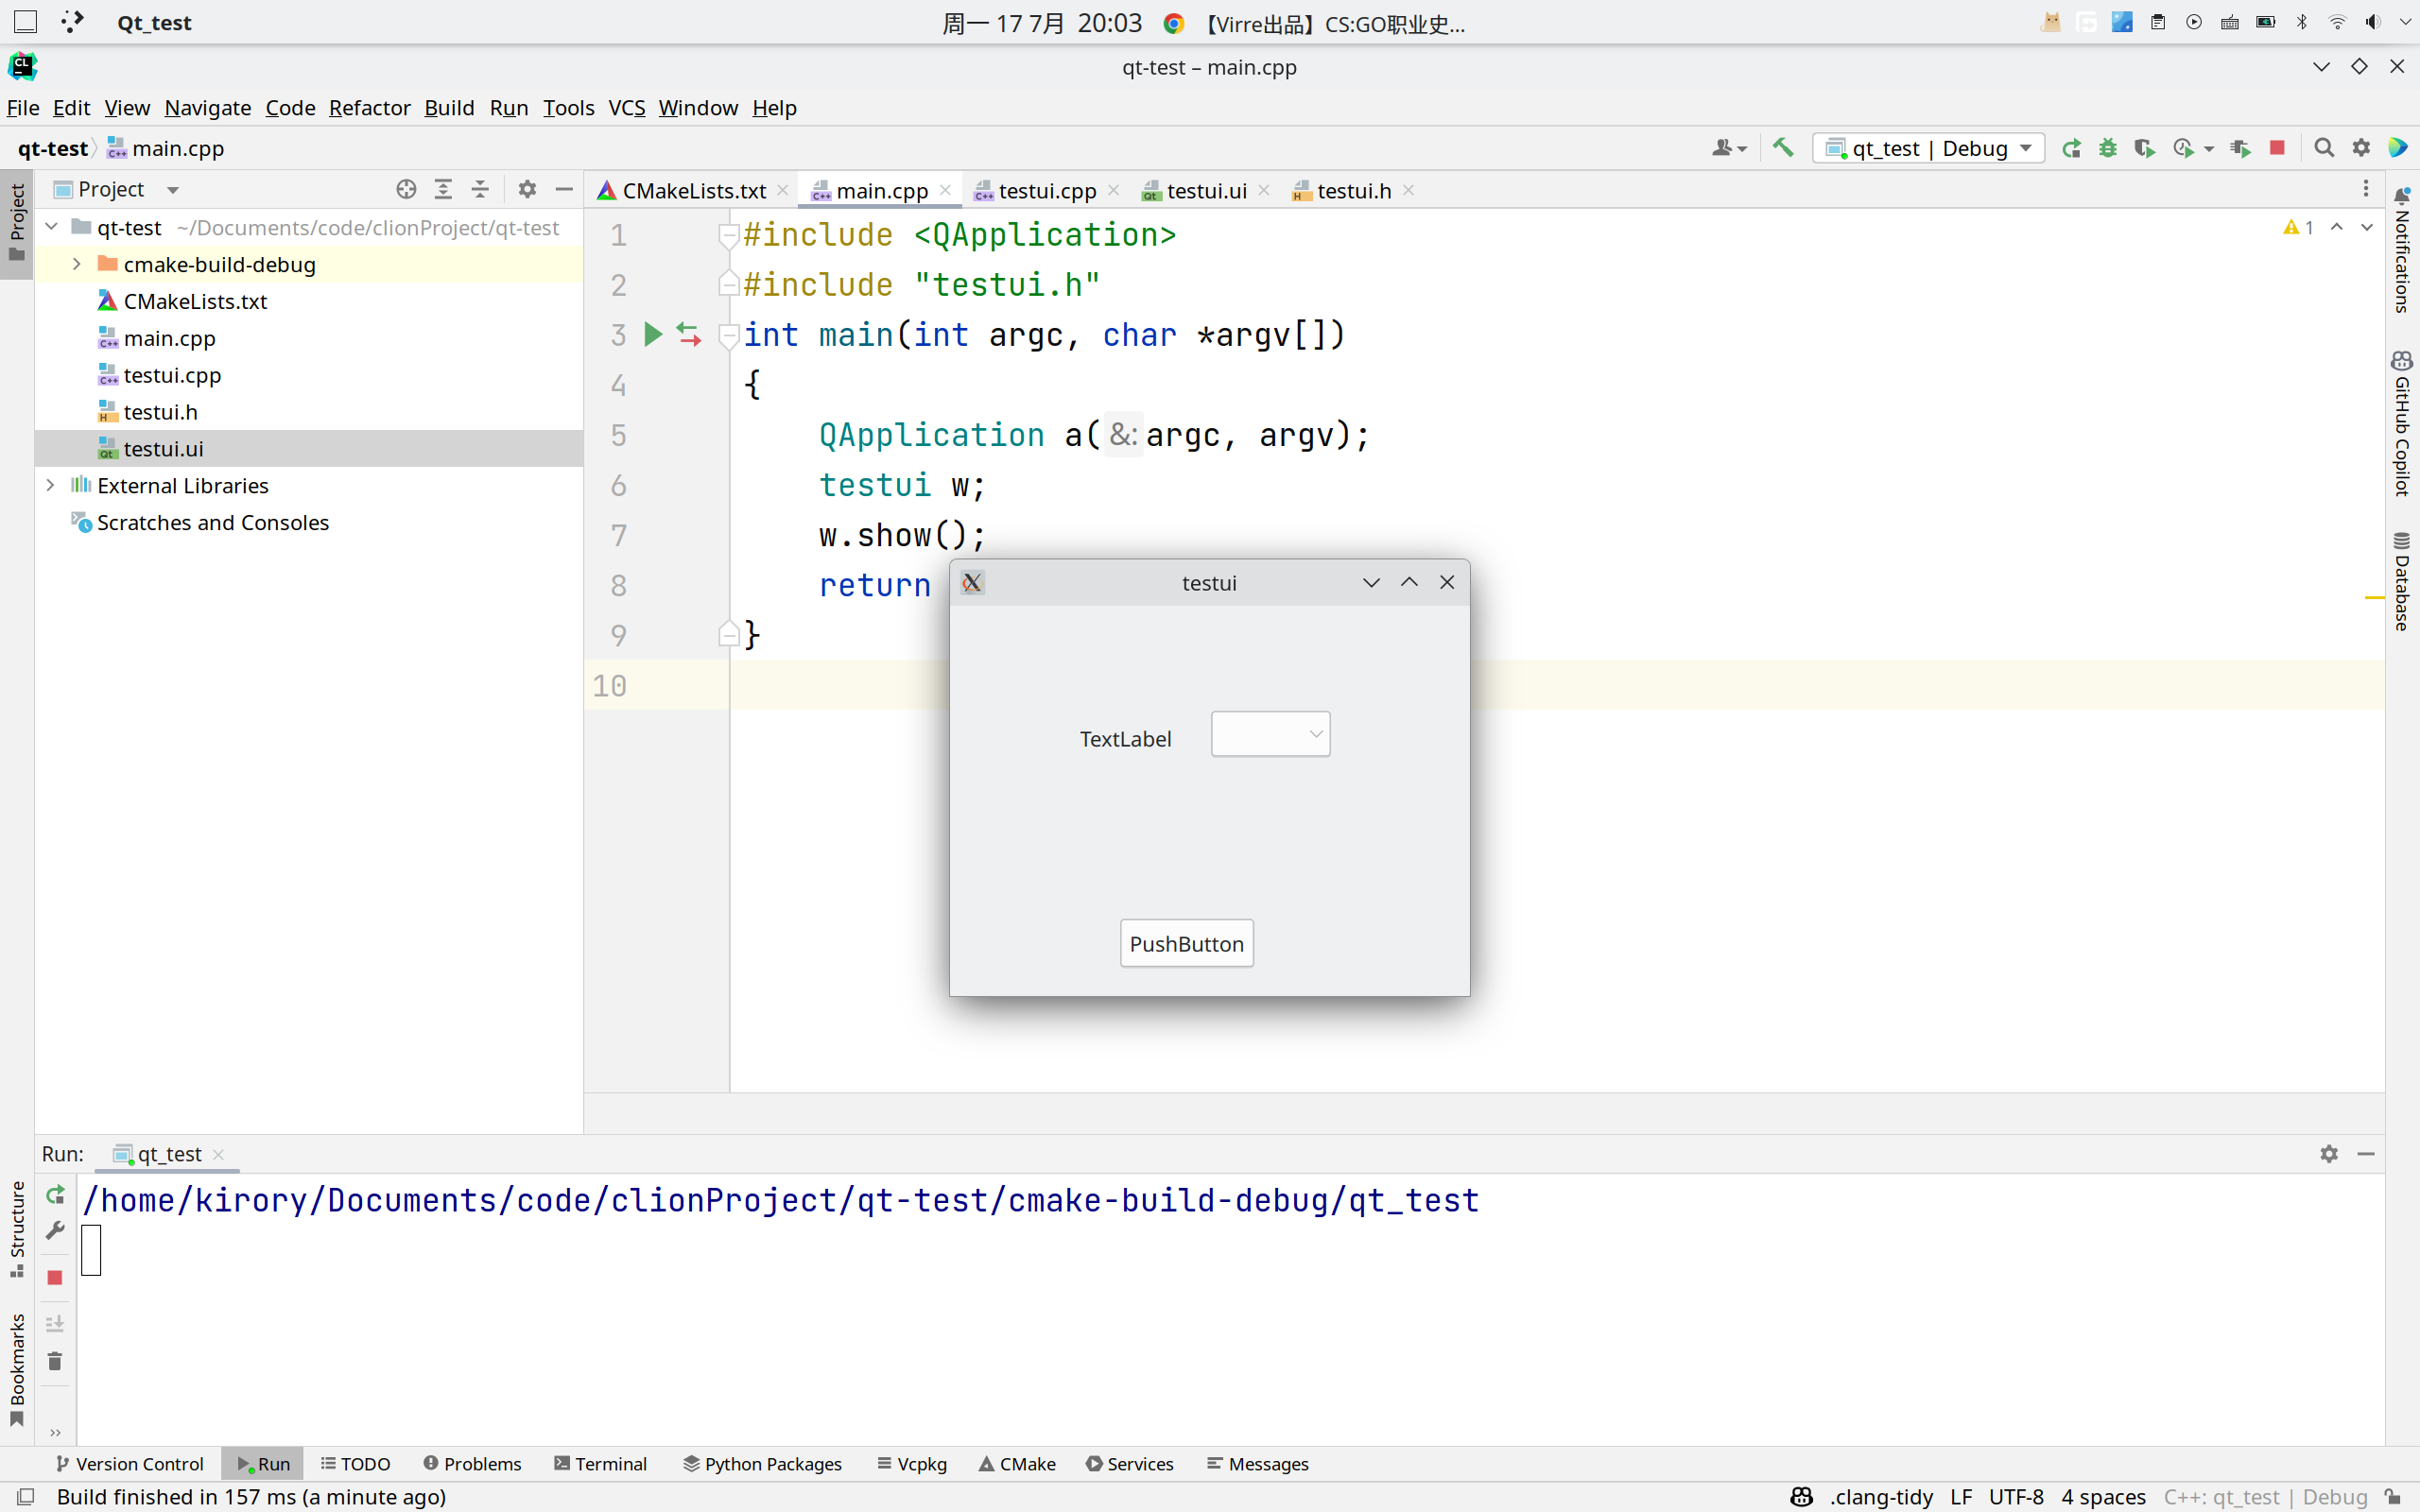
设计好窗口后,保存退出该界面。此时如果需要使用刚刚保存的那个窗口,就可以在main.cpp中引入与刚刚ui类一起被创建的头文件(在笔者的例子中是testui.h),在这个头文件中被声明的类就是之前所保存的那个窗口类。我们通过这个类声明一个变量,并通过.show()函数将他显示出来。以下是示例代码:
1 | |
在运行之前,我们需要检查Cmake的配置,保证新增的三个文件也能被编译。在项目下CMakeLists.txt中的add_executable()一行修改参数,加入所有需要编译的文件:
1 | |
通常情况下,CLion会自动将新增文件加入到编译文件列表中,不需要手动加入。
随后我们编译并运行该项目,成功显示该窗口:
可能出现的问题:AutoUic error
1 | |
Uic是将你的.ui类文件转化为.h头文件的用户界面编译器,CLion会默认在CMakeList.txt中将其设置为自动编译。出现自动编译错误的情况往往是在创建ui类时其名称中带有大写字符(AutoUic的一个奇怪的特性,你创建的时候输入大写,但是实际生成的.ui文件和相应头文件都是小写,头文件里的类又是大写,这很可能导致uic编译时参数错误无法生产正确的头文件或是头文件名)。
想要避免这个错误,在创建.ui类时请将其名称设置为全小写字母。如果你需要使用大写名作为ui类的名称,那么也可以手动来使用uic编译.ui文件。在你的.ui文件所在目录下输入如下简单的命令:
1 | |
这样就会在.ui文件的同目录下生产ui_开头的头文件。
如果你经常会使用上述方法手动使用uic,那么笔者这里推荐可以吧uic也加入到外部工具中,添加和使用方法与Qtdesigner一致,添加时的各参数如下:
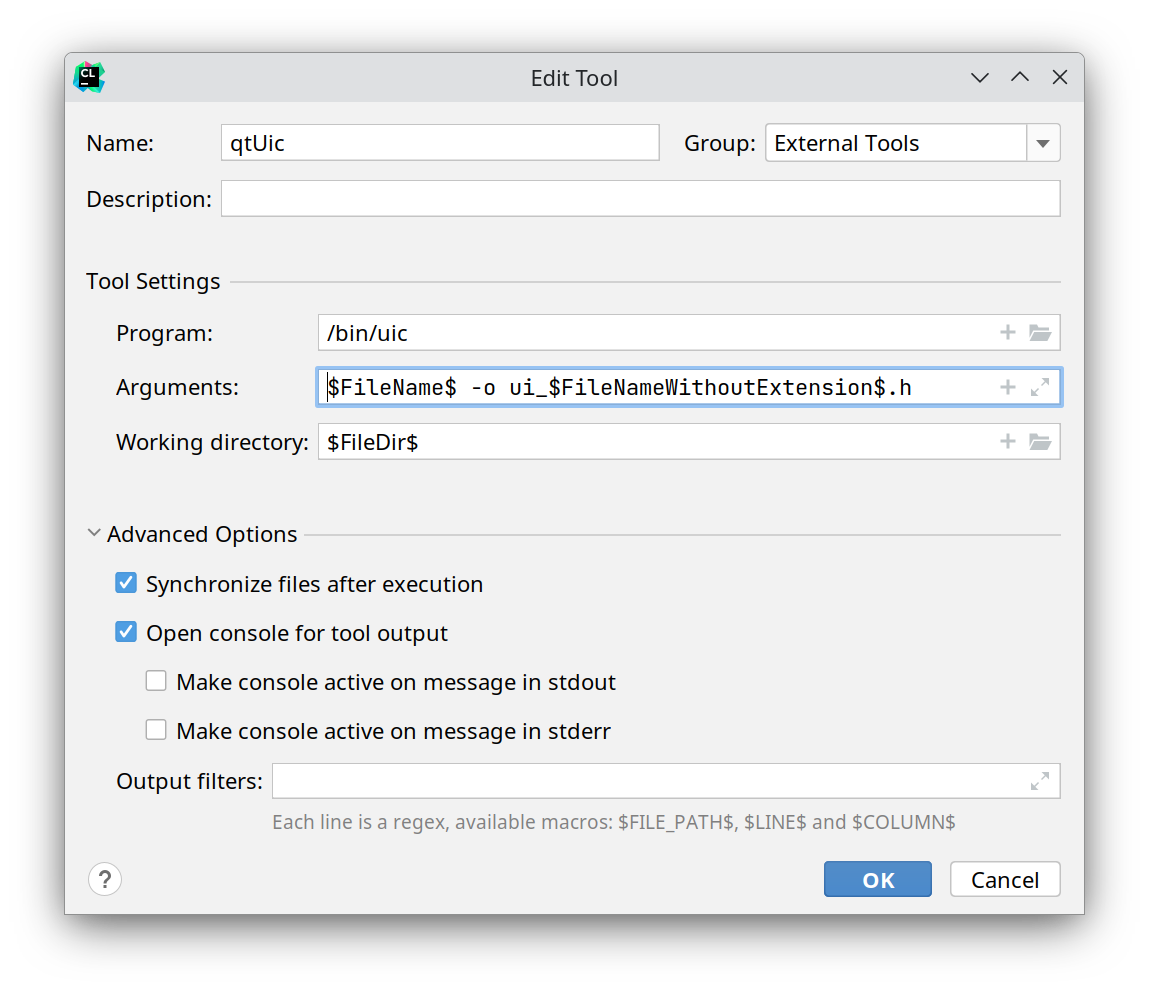
注意参数栏请按照笔者上面的写法,使用效果与命令行使用的方法一致。程序一栏根据uic程序所在目录调整。
至此CLion+Qt的开发环境基本配置完成。
后话
兴趣使然发的第一篇博客,没啥技术含量。CLion本身对Qt的支持就很好,本篇主要记录笔者在CLion配置Qt工具的过程和碰到问题的一些解决方法。一些问题在第一次配置时碰到真的很令人头大,因为网上检索的资料的解决方法部分没有具体说明针对的错误情况,这导致需要对这些方法一个个尝试(有一些问题甚至能检索到的资料很少TAT)。本篇提到了某些问题的具体解决方案,至少在笔者遇到这些问题时能够解决,也有一些并未尝试的方法是考虑到可能出现的状况而提出的,其部分来源于网上检索到的资料,也有来源于官方文档。
文章篇幅有限,可能有疏漏或错误之处,欢迎指出。
Foreword
Qt is a cross-platform C++ application development framework, often used by frontend programmers to design and develop GUI applications. CLion, on the other hand, is a powerful cross-platform IDE developed by JetBrains for C/C++ program development.
Qt's integrated development environment comes with QtCreator as an IDE for writing programs, which is quite good. However, as a multi-platform user, the author has become accustomed to CLion's C++ development environment. Therefore, I tried to use CLion as a platform for developing Qt applications. CLion itself supports creating Qt projects and also supports using QtDesigner (the visual graphic design interface in the Qt integrated development environment) as an external tool, so its deployment is not actually complicated. However, tutorials on the internet are generally based on Windows systems, and while Linux systems can theoretically adopt the deployment method of Windows systems without issues (after all, both are cross-platform applications, and the codebase is completely portable), in practice, the author encountered several pitfalls and discovered some problems that might not occur on Windows but do on Linux. This article will briefly describe the deployment method of the Qt+CLion environment on Archlinux and solutions for potential problems.
Deployment Process
Installing Qt5.15.x
There are many methods for installing Qt on Linux available online. Here, I will use ArchLinux, which the author uses, as an example (installation methods for different Linux distributions are largely similar and can be found online, so I won't elaborate here). Qt 5.x and 6.x versions can be installed from Arch's official repositories, while earlier versions can be installed from the AUR repository. Here, the author recommends installing version 5.15, as Qt5 is a relatively stable and long-term supported version. Open a terminal and enter the following commands:
[CODE_BLOCK_1]
If you need to use Qt's built-in IDE, you can also install QtCreator:
[CODE_BLOCK_2]
Since CLion will be used as the development environment, installing QtCreator is optional. For information on Qt installation and configuration, refer to the official wiki's documentation on Qt.
If you are using a KDE desktop system, it is highly likely that you have already installed Qt-related development components when installing the desktop system (as KDE itself is developed based on Qt's GUI tools). You can check the installed qmake and Qt component versions in your system using the following command, and also get information about the Qt installation location:
[CODE_BLOCK_3]
If the system reports an error stating that the command cannot be
found after inputting it, this indicates that Qt basic components are
not installed in your system, or your qmake program cannot be found in
the /usr/bin/ directory. qmake not being in this directory
might be because it wasn't downloaded via the system's package manager,
but rather Qt was manually installed using the official downloader or an
offline package. Then you can try the following command to link the
qmake program to the specified directory:
[CODE_BLOCK_4]
If, after entering the qmake version query command, qmake shows that no qmake path and version are specified, or if you have multiple versions of Qt installed and want to specify a particular version for use, then you need to change the Qtchooser settings; this is a package that allows you to specify Qt and qmake versions. There are many documents available online regarding the usage of Qtchooser, which you can search for yourself. Generally, Qtchooser defaults to a specific version and does not require manual changes.
CLion Configuration for Qt Environment
First, of course, you need to install CLion. Go to JetBrains' official CLion download page to download and install the relevant package. Of course, there are also CLion packages in Arch's AUR repository, which can be installed directly using package managers like yay or paru:
[CODE_BLOCK_5]
After downloading, open CLion and create a QtWidgets project, as shown below:
Select the language standard and Qt version according to your installation. Version 5 means version number 5.x.x, and so on. Here, the author installed version 5.15, so I will choose 5.
The Qt CMake prefix path allows CMake files to find your Qt
components during compilation. Normally, if you install from official
repositories, you don't need to fill in this field. If you installed it
manually, or if the project compilation later reports an error that Qt
cannot be found, then you need to add your Qt path in this field, or in
the project's CMakeLists.txt, add the following code before
the find_package() function:
[CODE_BLOCK_6]
Of course, there's another way: add this prefix path to your environment variables. Enter the following command in the terminal:
[CODE_BLOCK_7]
The above two setup methods were found by the author online. Their feasibility cannot be guaranteed due to variations in each person's installed environment and system. For more information about CMake compilation of Qt, you can refer to the official Qt documentation here.
After the project is created, it will come with example code. Let's
directly compile and run the main.cpp file to see if it can
run successfully:
After successful execution, you will see the example program. It is a window filled with a "Hello world!" button, and the window name is the project name.
Of course, by now you can already use CLion to write Qt-related
programs. However, we also need to configure Qt's GUI design tool. This
way, you can use a visual interface when designing window styles, rather
than tweaking code line by line. Qt's visual graphic design interface
tool is QtDesigner. It is usually included in the qt-base
package we installed and does not require separate installation. Now we
need to import this tool into CLion. In CLion's settings menu, select
Tools \(\rightarrow\) External Tools,
and add the designer (or designer-qt5) program to external tools, as
shown below:
In the Program field, enter the directory of the QtDesigner program.
You can refer to the path filled in by the author here. The target
program name can be designer or designer-qt5.
Refer to the information entered by the author in the image above for
the Arguments and Working directory fields. This ensures that any files
you create in the project's subdirectories can be found.
After creation, create a Qt .ui class file in the project directory (you can create it wherever you want within the project directory). When creating this file, a .h header file and a .cpp file with the same name will be automatically created. Then right-click your .ui file and open it with External Tools \(\rightarrow\) Designer:
After opening, you can visually design window components in this interface:
After designing the window, save and exit the interface. If you need
to use the newly saved window at this point, you can include the header
file created along with the .ui class (in the author's example, it's
testui.h) in main.cpp. The class declared in
this header file is the window class that was previously saved. We
declare a variable of this class and display it using the
.show() function. Here is the example code:
[CODE_BLOCK_8]
Before running, we need to check the CMake configuration to ensure
that the three newly added files can also be compiled. In the project's
CMakeLists.txt, modify the add_executable()
line to include all files that need to be compiled:
[CODE_BLOCK_9]
Normally, CLion automatically adds new files to the list of compiled files, so manual addition is not necessary.
Then we compile and run the project, and the window is displayed successfully:
Possible Problems: AutoUic error
[CODE_BLOCK_10]
Uic is the user interface compiler that transforms your .ui class
file into a .h header file. CLion automatically configures it for
automatic compilation in CMakeLists.txt by default.
Automatic compilation errors often occur when the name of the .ui class
contains uppercase characters during creation (This is a peculiar
characteristic of AutoUic: you enter uppercase when creating it, but the
actual generated .ui file and corresponding header file are lowercase,
while the class within the header file is uppercase. This can lead to
incorrect parameters during uic compilation, preventing the generation
of the correct header file or header filename).
To avoid this error, please set the name of the .ui class to all lowercase letters when creating it. If you need to use an uppercase name for the .ui class, you can also manually compile the .ui file using uic. In the directory where your .ui file is located, enter the following simple command:
[CODE_BLOCK_11]
This will generate a header file starting with ui_ in
the same directory as the .ui file.
If you frequently use uic manually with the above method, then the author recommends adding uic to external tools as well. The adding and usage methods are consistent with QtDesigner, and the parameters for adding are as follows:
Note that the Arguments field should follow the author's writing above. The effect of use is consistent with the command-line method. The Program field should be adjusted according to the uic program's directory.
At this point, the basic configuration of the CLion+Qt development environment is complete.
Postscript
This is my first blog post, driven by interest, and doesn't contain much advanced technical content. CLion itself has excellent support for Qt. This article mainly records the author's process of configuring Qt tools in CLion and some solutions to problems encountered. Some problems encountered during the first configuration can be quite frustrating because the solutions found online often do not specify the exact error situations they address. This led to having to try these methods one by one (and for some problems, very little information could even be found TAT). This article provides specific solutions for certain problems, at least they worked for the author when these issues were encountered. There are also some untested methods proposed considering potential situations; some of these methods come from online resources, and others from official documentation.
Due to the limited length of the article, there may be omissions or errors. Please feel free to point them out.